Quantcast
Channel: SportTracks blogs
Viewing all 221 articles
Browse latest View live

Sports Tech Gear of the Year 2018

$
0
0

It's always interesting to look back at all of the innovations, advances, and big stories in the sports-tech hardware realm as the year comes to a close, and in this regard, 2018 had a lot to offer. This year heart-rate monitors got supercharged, many new products shipped with built-in power meters, and the world of Garmin got a lot more musical...   

Attack of the advanced heart-rate monitors!  

Like we reported last year, built-in optical heart-rate monitors are ubiquitous these days. Every activity tracker and sports watch seems to have one. This trend continued in 2018, but one thing that changed is that advanced sports watches and other devices started pushing the capabilities of heart-rate monitors to new heights.

2018 saw the introduction of the Polar Vantage V and Vantage M, two advanced multisport GPS watches that both feature elaborate 9-LED optical heart-rate monitors. They boast an accuracy of plus or minus 1% and have dedicated sensors that detect skin contact. In addition to the ambitious HRM, the Vantage V model is also the world's first sports watch that includes a built-in running power meter.

The heart-rate monitors on the Polar Vantage V and Apple Watch Series 4

2018 also brought the first major redesign of the Apple Watch with the new Series 4 models. While they don't look that different, their screens are now 15% larger. The built-in optical heart-rate monitor was redesigned, but the overall approach of utilizing green LEDs to measure workout HR and infrared LEDs to measure 24-hour HR is similar.

The Apple Watch typically misses the first 30 to 60 seconds of heart-rate data in a workout, but once it's on it delivers impressive accuracy. The improvement likely has more to do with software, as Apple appears to be utilizing their new machine learning framework for HR tracking in watchOS 5. When older generation Apple Watches get updated to watchOS 5, they see improvements in HR accuracy as well.

The Series 4 Apple Watch also features dedicated electrodes for giving yourself electrocardiograms. This feature has only rolled out to the US so far, but it's a compelling advancement nonetheless. While not nearly as comprehensive as the multi-sensor EKG machines used in medical facilities, the Series 4 is capable of detecting atrial fibrillation, which can lead to stroke and heart failure. A pretty neat feature from the same little gadget you can use to send duck emojis to friends. 

On the topic of interesting 2018 heart-rate monitors, it feels necessary to mention the Scosche Rhythm 24. This is an HRM that straps to your forearm, tricep or bicep as opposed to your chest or wrist. This year's Rhythm 24 model builds on the popularity of the Scosche Rhythm+ model, which was known as one of the most accurate HRM's around. Both the old model and the new Rhythm 24 feature Valencell sensors, but the technology in the 24 is 5 years younger, making it even more precise and efficient.

A graphic illustration of a female wearing three Scosche Rhythm 24 heart-rate monitor

The new Rhythm 24 model provides 24-hour battery life (up from 10), an array of LEDs that provide battery life and zone information, onboard memory for recording workouts without a watch or while swimming, dual ANT+ and Bluetooth Smart connectivity, various sport modes, running and cycling cadence tracking, a dedicated app for configuring, HRV monitoring and integrations with HRV4Training and Elite HRV, an improved arm-strap and more. 

Music + Spotify finally arrived on Garmin watches!

Runners who never wear headphones during workouts did not get excited about this next piece of news from 2018. This year not only did Garmin finally start releasing watches with onboard music storage, but they also officially integrated with Spotify. This scratched two major itches for runners who like to rock out: you could finally run with a Garmin and listen to music without needing to bring a phone or another music playing device, and you could finally sync content from the world's most popular music service.

The first Garmin watch that featured music storage, playback, and Bluetooth headphone connectivity was the Forerunner 645 Music, which was announced back in January. Over the summer Garmin announced the Fenix 5 Plus line, which also featured music capabilities. Spotify integration didn't arrive until early October for the Fenix 5 Plus, then in late October it came to the 645 Music. We're still waiting for the Spotify integration to trickle down to the Vivoactive 3 Music.

The Garmin Fenix 5 Plus on a graphical background

While we're on the topic of Garmin, it seems fitting to mention their Varia RTL510 Radar rear bike light, which came out in 2018. It's similar to their first-generation Varia radar bike lights, but this year's model greatly improved the design. Instead of needing a light and a separate radar sensor, both units are now integrated into a single device. If you're not familiar, the Varia radar lights communicate with your bike computer or sports watch to alert you when a vehicle is behind you. They let you know how many vehicles are behind you, and how quickly they're approaching. It's pretty amazing tech. 

Want a power meter with that?

The Polar Vantage V multisport watch wasn't the only device that shipped with a built-in power meter in 2018. The factory-integrated power meter trend reached the world of cycling as well. This year big brands like Specialized and Giant started including power meters as stock parts of high-end bikes. The Specialized power meter is extremely similar to the 4iiii Precision, a low-cost power solution that has a reputation for accuracy. The two companies have a partnership, which explains the likeness. The origin of the Giant power meter is more mysterious. It's a dual-sided solution with pedal balance metrics and cadence. 

These offerings are more about bike upsells than anything else. If you're buying a new superbike, it may as well come with a built-in power meter, right? The idea of getting a new bike that comes with a power meter out of the box is a nice idea. No fussing with chain rings, pedal swapping, or worrying about crank arm clearances. However, there's something comforting about carefully choosing a reputable brand and model to put on your bike.

Thanks for checking this out this post! Did we miss any important sports-tech gadgets that you think should have been included? Let us know in the comments below...   
News
http://cache.sporttracks.mobi/blog/images/2018/12/sports-tech-gear-garmin-fenix-5-plus-graphic-cover.jpg

Foam Rolling for Endurance Sports

$
0
0

In order to execute your best performance in endurance sports, you need to utilize every possible small gain, which is why you should dedicate a short amount of time before each workout to foam rolling. Just like coaches who target workouts that stimulate specific responses, it's wise to only use foam rollers in specific ways, rather than rolling randomly and haphazardly — and potentially creating problems for yourself. This post shows you proper foam rolling techniques for endurance athletes, with detailed information and diagrams.

Why should you roll?

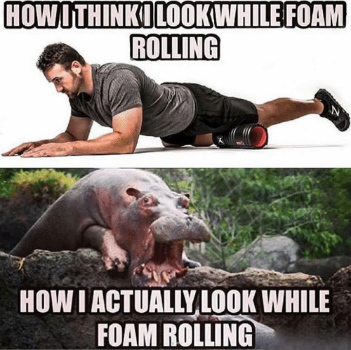
The popularity of foam rolling has increased dramatically over the past few years, and it's garnered a reputation for being extremely painful. Perhaps you've seen funny memes like this:

Rolling does cause dull pain on certain muscles and ligaments, but it shouldn't be excruciating. If you experience intense pain, immediately stop and have it checked out by a physician. Above all, don't let unnecessary fear keep you from maximizing the benefits of foam rolling.

We have connective tissue beneath our skin called "fascia" that separates our muscles, in addition to keeping them attached and stabilized. When fascia is healthy, it's limber and moves smoothly. Unfortunately, the repetitive motions of endurance sports cause fascia to get bunched up, which keeps you from preforming optimally. The solution is to do some simple foam rolls, which you can execute by yourself in under 10 minutes.

How to get rolling...

Keep things simple and focused. Concentrate on a few specific areas, and get yourself in the habit of rolling before every workout. There are advanced foam rollers with ridges and electronics, but the inexpensive Basic High Density Roller option from Amazon works well and is a good place to start. If you travel a lot, there are smaller rollers available that have hollow cores that are easy to pack, such as the TriggerPoint Grid Foam Roller.

Yoga mats can also be helpful. They keep the roller from slipping when you're applying pressure at odd angles, and they make floors more comfortable. But don't let the absence of a yoga mat keep you from rolling. Focus on improving your performance and get on the floor.

Only use your bodyweight to apply pressure. Work on each targeted area for 30 to 60 seconds. If you feel any tightness or sensitive areas, pause and relax on this spot for 5 to 30 seconds. Don't rush your rolls. Always move slowly and gently.

How to foam roll quads  

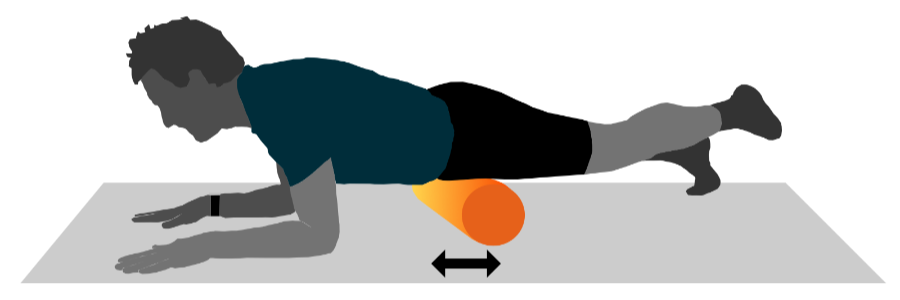
A graphic illustration of a person using a foam roller on their quads

Quadriceps do lots of repetitive work in running and cycling, so it's an important area to roll:

  • Work one quad at a time
  • Keep one leg on the floor resting on your knee, and the other leg on the roller with your foot elevated off of the ground
  • Do not use the roller on your knees
  • Only go as far as the very top of your knee and roll up to your hip
  • For extra pressure after a workout, instead of resting on one knee lift that leg up

How to foam roll tensor fasciae latae (TFL)

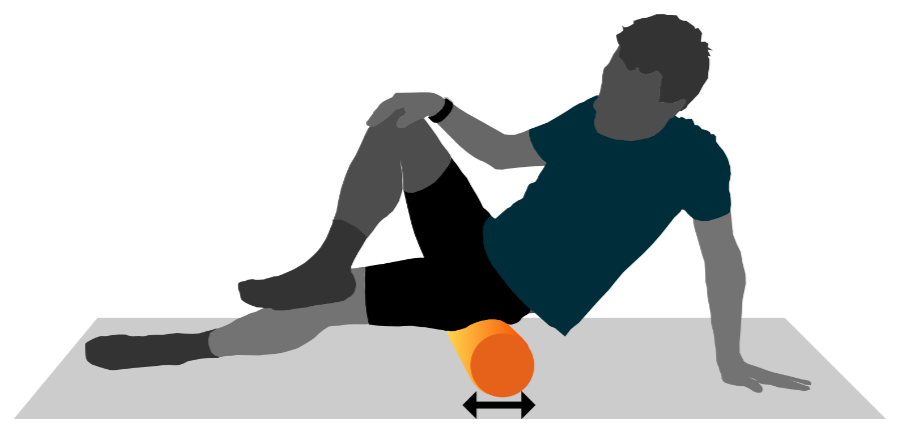
A graphic illustration of a person using a foam roller on their tensor fasciae latae (TFL) muscle

Your tensor fasciae latae (TFL) is a short muscle at the top of your thighs. It's connected to your iliotibial tract (IT band) and works in concert with the gluteus maximus when running. Rolling your IT bands can cause damage in some situations, but rolling your TFLs is beneficial and can alleviate issues with your IT bands without interfering with them.

  • Familiarize yourself with the exact location of your TFL muscles
  • Work one TFL at a time, leaning your weight into the side that you're targeting
  • Keep the opposite foot on the floor for balance and stability
  • On the side you're rolling, raise that foot off of the ground and point your toes slightly inward
  • Keep the rolling motion short, because the muscle itself is short
  • Remove the roller and use a tennis ball in its place to more precisely work tight and sensitive areas

How to foam roll glutes

A graphic illustration of a person using a foam roller on their glutes

Your glutes are a big part of the engine that powers your runs and rides. Like the TFL, glute muscles are connected to IT bands. Working your glutes with a roller can benefit your IT bands without interfering with them.

  • Work one cheek at a time
  • Sit on your roller with knees bent, supporting yourself with your hands behind you
  • Cross your leg leaning your weight onto the side you're targeting and balance yourself by putting one hand on your knee like in the graphic above
  • Perform a short roll targeting only your glutes
  • They are big muscles, so you should move around a bit to work the entire area 

How to foam roll calves

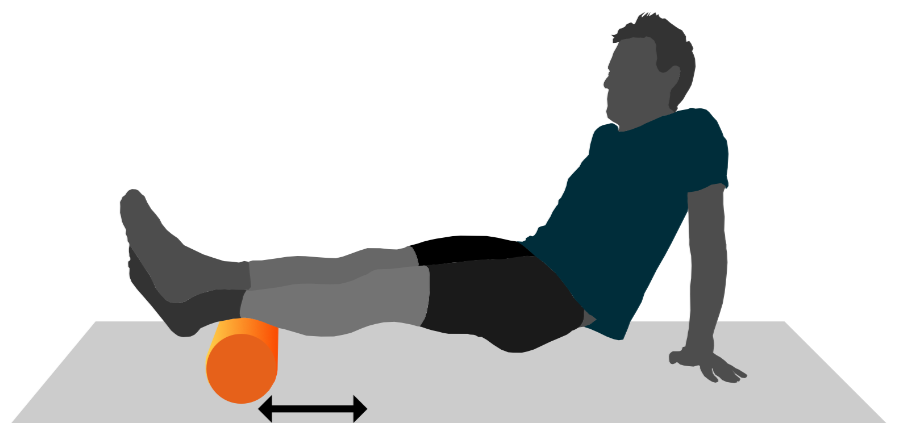
A graphic illustration of a person using a foam roller on their calves

While not completely necessary, crossing your legs when foam rolling your calves adds a healthy amount of pressure.

  • Work one calf at a time
  • Place your ankles on the roller as if you were resting them on a coffee table
  • Lift your body off the floor with your hands
  • Roll from the ankle to just below the back of your knee
  • After rolling the first calf, cross your legs again so the other calf is in the lower position

How to foam roll hamstrings

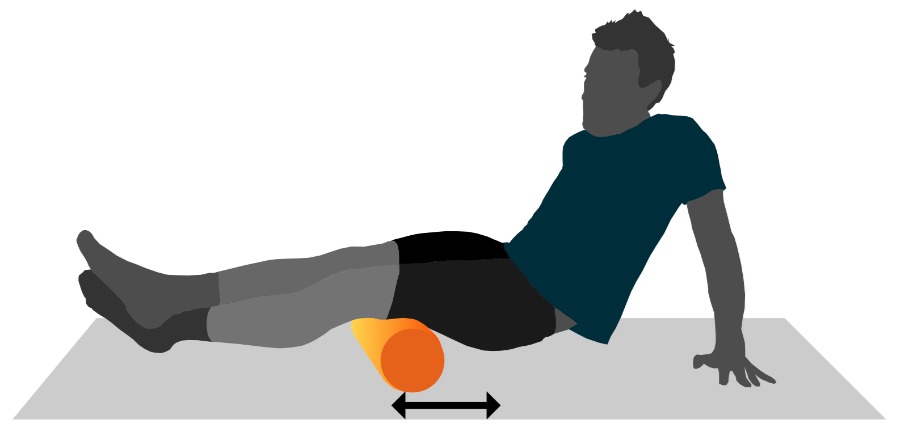
A graphic illustration of a person using a foam roller on their hamstring muscles

The hamstring position is very similar to what you do for the calves, and because these muscles are on the back of your legs, crossing your legs adds helpful pressure.

  • Work one hamstring at a time
  • Start with the roller at the top of the backside of your knee
  • Roll up to the glutes and back
  • After rolling the first hamstring, cross your legs again so the other one is in the lower position

Final tips...

As long as you use it carefully, a foam roller can be seriously helpful. They can even be used to roll after a day of traveling or when you’ve been sitting at a desk for long periods of time. Be mindful not to roll bones, and don’t blindly roll an injury without advice from a doctor or an experienced coach.

Training
http://cache.sporttracks.mobi/blog/images/2018/12/how-to-use-a-foam-roller-cover-graphic.png

Reverse Periodization

$
0
0

It's the beginning of the year and the perfect time to decide how you're going to plan your training and racing for 2019. Last year at this time we covered the basics of periodized training and how you can plan your entire calendar year in order to put in your fastest possible performance. In this post we're taking a close look at "reverse periodization", which is a similar — but better suited to make use of the short and cold days of winter. This approach also may make you faster, as it does for many enthusiast and professional endurance athletes.

You're likely familiar with the principles behind "traditional linear periodized training", where you start out with weeks or months of long workouts in zone 2 in an effort to slowly build up your base endurance. However, it can be difficult to fit so many lengthy workouts into a busy schedule (it isn't easy to fit in 4 hours on a bike trainer before work in the morning). Plus, harsh winter weather and limited daylight make it difficult to stick to a plan. Reverse periodization moves shorter, more intense workouts to the first stages of training, which can be easier to fit into your winter calendar.

A photograph of an athlete running outdoors in the snow

Training by any other name would smell as sweet

Don't think of reverse periodization as a radical rebuke of linear periodization, because they are not that different. Done correctly, both models target specific adaptations over time and focus on providing race-like workouts the closer you get a race. They also don't act as singular training plans, but rather as broad strategies that take entire seasons into account. 

The main difference with reverse periodization is that instead of starting out with a "base phase", you jump right into the "build phase" with low volume, high intensity workouts that target your thresholds. For this reason, reverse periodization isn't the best choice for people who are just starting out in endurance sports, or for people who are completely out of shape. Without the slow ramp-up of fitness that you get with linear periodization, there's a greater chance for injury in the first phase of training.

A chart that explains the difference between traditional periodized training and reverse periodization in endurance sports

Base training comes later in reverse periodization, which lowers the chance injury closer to race day.

It's important to note that there aren't strict divisions between these approaches to training. A coach or a self-coached athlete will often include threshold workouts during the base phase of a linear periodized plan. The same holds true of reverse plans. As shown in the chart above, the race phase of training tends to be pretty similar between the two, with more recovery and a decreasing amount of training as race day approaches.

How to get started with reverse periodization

Creating an effective reverse periodization plan isn't as simple as reorganizing the phases of a structured linear periodization plan. There's a lot more nuance, and the workouts you plan will vary greatly depending on the sport, the duration, and the date of the "A race" you want your fitness to peak for. This kind of training is definitely not "one size fits all".

If you're an experienced self-coached athlete who has created and executed linear periodized plans in the past, you should consider giving reversed periodization a try. You may have reached the limit of what a linear plan can provide, and that a reverse plan can help you break through a plateau and reach new heights.

The first phase of training in reverse periodization isn't just about working to improve your thresholds. This is the time to work on improving upon your weaknesses from the previous season. As you move into the base phase, you will continue with some higher zone workouts while increasing volume until you are closer to race-like distances and durations.

A screenshot of the calendar from SportTracks endurance sports training software showing a reverse periodization plan

If you're not an experienced self-coached athlete, this is an area where seeking the advice of an expert will pay off in a big way. Keep in mind that every athlete responds differently to stimulus. What works well for one person can be much less effective for the next person, and so on. Some experimentation will likely be necessary to find the training model that works best for you.

Wrapping up...

In Australia, summer has just begun. There is more daylight and warm air, so doing lots of low intensity, time-consumptive base aerobic work is more amenable, especially for outdoor cycling. In the northern hemisphere it's the opposite. If you live in the top half of the planet and follow reverse periodization, your longer endurance workouts will arrive with the warm air and extended daylight of spring.

Part of the beauty of endurance sports is knowing that there's always more to learn and to tinker with. Even though periodization has been around since the 1950's, the strategies and refinements that coaches and athletes put into it are always evolving. It's possible that adopting reverse periodization into your annual training plan is the key to reaching your biggest goals. There's only one way to find out...

Training
http://cache.sporttracks.mobi/blog/images/2019/01/how-to-train-with-reverse-snow-runner-photo-cover.jpg

Running Form 101

$
0
0

We find it helpful to revisit the basics of endurance training at the beginning of the year when many people are just starting their fitness journey. Last year we covered Heart Rate 101 by clearly explaining the 3 most popular ways to use heart-rate data to improve your running. This year we're going over the basics of running form and how just a few simple tips can greatly improve your speed in longer distance runs.

One of the beautiful things about running is that it's an innate skill. You're instinctively hardwired to do it, but in order to run your fastest — you need to put some thought into how you turn one leg over the other. The mechanics of your body in motion is your running form, and it's something you can improve upon with basic know-how, and a little help from technology.

A photograph of a male runner outdoors

First and foremost, understand that your natural running form isn't inherently bad. There isn't a gold-standard that you need to strive to achieve. Ultimately, good form is about applying a few tried-and-true tips every time you run, keeping an eye on your data as a source of feedback on your performance, and making an effort not to let your form deteriorate as you get tired during longer workouts.

Head over shoulders — shoulders over hips 

Many of the problems with running form can be partially corrected by simply holding your body a certain way while running. Starting at your head, make an effort to hold it level, because this will relieve tension in your back. Avoid pointing your chin up or down. If you catch yourself staring at the ground as you run (which isn't uncommon when running uphill), make a point to look up and stare ahead. Try not to lean your head forward, though. Avoid slouching and run tall. Your back should be straight. Keep your head over your shoulders, and your shoulders over your hips.

An infographic that explains proper running form with an image of a female runner

Speaking of your shoulders, keep them relaxed as well. This will keep strain out of your neck, and remind you of your overall mission, which is:

Keep your upper body relaxed

We tend to focus on our legs and feet when we run, but it's equally important to keep your upper body relaxed. Make an effort not to clench your jaw, or to hold a grimacing or tight expression on your face. Straining these muscles wastes valuable energy that could otherwise be used for speed and distance.

Your arms should swing at a 90 degree angle at your sides, and they should not swing across your chest. Try not to swing your arms across the center of your body. Your hands shouldn't be balled up into tightened fists. Keep your hands and fingers loose, as if you were carrying eggshells between your thumbs and index fingers, and you did not want them to crack any further. Why should you imagine you're a weirdo that's running around with cracked eggs in your hands? At this point we don't have a good answer to that question. :)

Okay, okay. What about my lower body?

You might assume this section would be somewhat complicated, but it's not. The advice here is very basic. Make an effort to have your feet land under your body, rather than in front of it. Landing in front creates a damaging impact that your body must absorb, and it acts as a braking force that slows you down. Another simple tip is to try not to bend your knees too much. Keep them slightly bent, but don't overdo it.

There's been a lot of talk over the years about which type of footstrike is most beneficial. Some people believe that heelstriking is bad, and that it's better to land on your midfoot, and have more of a gliding form. The latest research suggests that rather than worrying about footstrike angle, you should mostly concern yourself with cadence, which is the number of steps you take per minute.

A screen-shot of SportTracks endurance sports training software showing cadence and pace data

Cadence and pace data on a track interval workout in SportTracks 

Tracking your cadence is best achieved with a GPS running watch. It's a number you can see by quickly glancing at your watch as you run, and you can analyze it in training software afterward. For a long time it was thought that every runner should strive to have a cadence of 180 SPM (steps per minute). However, seeing as we all have different length legs and various goals for distance and speed, having a universal goal of 180 SPM doesn't make sense.

In general, you want your cadence to be high. You want to have your legs turning over fast enough that your body stabilizes when running. Slower cadences are less taxing physically, but they tend to be bumpier and more jolting to your body. The key is to get your cadence high enough that your run smoothes out. When this happens, it doesn't matter where your footstrike is landing, as long as your overall run is smooth and stable. 

And... That's about it for the basics of running form! This is an area you can get more into with advanced hardware like the Stryd running power meter and RunScribe wearable run analysis sensors. These devices track a number of different running efficiency metrics, all of which you can view and analyze in SportTracks. We hope these tips are helpful, and give you a more efficient and injury-free gait!

Training
http://cache.sporttracks.mobi/blog/images/2019/01/basics-of-running-form-graphic-cover.png

Cold Weather Running Gear 101

$
0
0

Looking for some pro tips to keep you toasty-comfortable when running outdoors all winter long? When I'm not tweeting up a storm as the SportTracks Social Media Community Manager, I work full-time at my local running store and have for many years — so I like to think this makes me somewhat of an expert when it comes to running gear and how to use it. Read on to learn more about my preferred best practices for running in the cold.

Layering: It's as easy as 1, 2, 3!

Let's start by reviewing the wardrobe fundamentals you'll need for cold weather running. Of course you'll need a good pair of tights to keep your lower half warm. Bottoms are pretty straightforward, but sorting out the ideal clothing combo for your top half can be  a little more complicated.

Layers are the key to keeping your core warm and happy on chilly winter runs. You'll want to start with a good base layer, or layer 1, as some like to call it. This would ideally be a piece that fits close to the body (think a thin, long-sleeve shirt) to hold in heat while wicking moisture away from the skin. This means that in selecting your first layer you'll want to opt for some sort of synthetic, moisture-wicking fabric, because everyone knows that cotton is rotten.

A photograph of a male running outdoors in snow

Pair your base layer with a second over-layer (or layer 2) that adds warmth but offers some sort of temperature control feature to accommodate for changing temperatures and conditions during your run. Popular layer 2 choices here in running store land include half or full-zip pullovers and jackets. I'm also personally I big fan of the vest as a go-to second layer. I find that here in the American southeast where winter temperatures tend to stay somewhere in 35 to 45°F (1 to 7°C)  range for the majority of the season, the vest offers sufficient core warmth and insulation, but also provides optimal temperature management as it allows heat to dissipate from the all-important arm pit body temperature control center.

However, if you live in a region of the world that is colder than central North Carolina, you may want to bypass layer 2 in favor of a layer 3. Let's define layer 3 as an outerwear piece that offers some sort of protection from the elements. Some examples of a layer 3 would be waterproof and windproof jackets, down jackets or vests, etc. In cases of extreme cold, gusty winds, and driving precipitation you may even consider implementing all 3 of the layers of winter running gear, but those situations tend to be few and far between here in our neck of the woods.

Which brings me to my second pro tip for dressing for cold weather running which is...

Don't over dress!

When it's really cold out I know it's tempting to bundle up like Ralphie's little brother in that scene from "A Christmas Story", but trust me, you'll have a much more pleasant running experience with a "less is more" approach. Avoid over-dressing and subsequently, overheating by asking yourself this simple question: What would I wear if the outside temperature was 20° warmer than the actual reading on my thermometer (or smartphone weather app)? Then put on the warmer weather outfit that you thought of and proceed with your run. You'll be surprised at how quickly your body makes up for those 20° once you get moving. Plus, it's my personal belief that feeling a little chilly on your run is far superior to feeling like a hot, sweaty mess. Just think of the chill as extra motivation to keep a little pep in your pace.

It's time to talk accessories...

We've got your core covered! Now we need a winning game plan to keep your hands, feet, and head warm. Above all else, you're going to need a good pair of gloves. For climates where your average running temperature will be around 35 to 45°F (1 to 7°C), you'll probably be fine with a basic mid-weight moisture wicking glove. However, if you're running in conditions that fall into the 20 to 30°F (-6 to -1°C) range or colder, you may consider adding a good pair mittens into your rotation. Mittens seem to do a better job of trapping warm air around the fingers than gloves, and therefore it is generally agreed that they feel warmer. 

...think of the chill as extra motivation to keep a little pep in your pace.

My personal favorite cold weather running accessory is what I like to call the glitten, a glove and mitten hybrid. A good pair of glittens (or any pair of glittens for that matter) features a traditional glove and a wind and weatherproof mitt that fits over it. This weatherproof mitt can easily be stashed in a pocket on the front of the glove as your hands warm up or temperatures rise. Thus, providing customized hand warmth for any level or intensity of cold weather you might encounter.

You'll also want to show your feet and ankles a little extra love when it's cold. For best results, try a thicker, more cushioned sock and experiment with fabrics such as wool that are known for their ability to maintain body heat while they wick moisture. You may also make a point to wear taller socks, in an effort to close that drafty gap that always happens between the top of your shoes and the bottom of your tights.

And finally, you'll need to keep your head warm! Don't let frozen, tingly ears and face wreck your cold weather training game. As with all other articles of running gear, we're looking for hats made of synthetic or wool material that will pull moisture away from the skin while retaining body heat at the same time.

Still not sure where to start?

No worries! I've put together this fool-proof temperature and outfit selection guide for your convenience! Check it out...

Temperature RangeWhat to Wear
45 to 35°F
(7 to 1°C)
Shorts and a long sleeve shirt and gloves — sounds chilly, but don't forget to dress for 20 degrees warmer than the actual temperature rule. You'll warm up quickly, I promise!
35 to 25°F
(1 to -15°C)
Tights or capris and a long-sleeve shirt (layer 1) with a vest or half-zip (layer 2), plus gloves and an optional hat or ear warmer.
25°F and colder
(-15°C and colder)
Full-length tights with a base layer (layer 1) and windproof jacket (layer 3), plus gloves or mittens and a hat.

And there you have it folks, my guide to dressing for success to cold weather running! Just remember, there's no such thing as bad running weather as long as you have the right running gear! Now get out there and log some cold weather miles in pursuit of your big, exciting 2019 running goals! Until next time, happy trails!

Training
http://cache.sporttracks.mobi/blog/images/2019/01/how-to-dress-male-runner-photo-cover.jpg

New Feature: Join Workouts!

$
0
0

We try to give you as much control as possible at SportTracks. You have full control of your privacy, the layout of your pages and charts, and you have deep editing capabilities with workout data. We recently rolled out a feature that enabled you to easily split a workout in two, or to trim the beginning and end. Now we've made it possible to easily join two workouts as one!

At first we thought this would be something you wouldn't need very often. As fate would have it, I had an issue with my watch that made me create three separate workout files for a single swim a day after this feature went live. I needed to join workouts right away!

First I went to my Workouts page and filtered by sport chronologically:

A screenshot of the Workouts page of SportTracks endurance sports training software

You can see the 3 swim workouts at the top from 1/3/19 that were all the same swim. I hit the Select button and put checkmarks beside the first 2 swim workouts (you can only join 2 workouts at a time):

A screenshot of the Workouts page in SportTracks endurance sports training software showing pool workouts

Then I hit the new Join button in the upper left side of the screen and a dialog box opened up to warn me that the change was permanent. I clicked Ok.

A screenshot of SportTracks endurance sports training software showing the Join Workouts dialog box

After that, the two workouts were combined as one. Then I went through this process a second time to join the third workout, and afterward I had a perfect single pool workout:

A screenshot of a swimming workout in SportTracks endurance sports software showing SWOLF, heart rate, stroke rate, and strokes

The new Join Workouts feature is yet another example of a useful utility in SportTracks that you simply won't find on competing platforms. We sincerely hope your training tools operate flawlessly and you never need to use it. But, in the event that your tech gives you trouble, you will have ease of mind knowing that with a few simple clicks your training log will be correct.

Happy training!

How To
http://cache.sporttracks.mobi/blog/images/2019/01/join-workouts-screenshot-cover.png

Pain Cave Gear Tracking

$
0
0

Indoor cycling trainer setups are made up of many separate pieces of gear, and it's common for people to use some — but not all of it when they ride outdoors. This makes it a little tricky to properly track how much use this equipment gets, but it's still worth it to do so. Why? Your safety and performance rely on knowing the accurate amount of wear and tear your gear has endured. You don't want to start a race or an intense training ride with a bike part that's ready to be replaced.

Where to start?

The first step is to track the trainer itself, and the cassette (if it has one). If you have a brand new trainer, add it to your gear tracking software right away. If you've already been using a trainer, it's easy to add it to all of your past indoor workouts. SportTracks lets you quickly import your entire history (even if you're just using the 45-day free trial), and then add gear in bulk to specific workouts in just a few simple steps.

A photograph of a Wahoo KICKR Core with a blue road bike mounted to it on a Wahoo KICKR floor mat on a hardwood floor

Some people have dedicated bikes for their indoor trainer, while others use their bikes both indoors and out. If you have a bike that's used exclusively on a trainer, then it's easy to track the usage. Just be mindful to properly track any gear that may be moved between your indoor and outdoor bikes, such as power meter pedals, like the popular Favero Assiomas.

Bikes with two lives

If you have a bike (or bikes) that you use both indoors and out, tracking requires a little more care. I track every part of my outdoor bike separately, and all of the parts are grouped and assigned to a sport so they automatically get tagged when a cycling workout is auto-synced to SportTracks. It's great because it's all tracked automatically in the background and I don't have to do a thing. For example, I can quickly see that my front Continental Grand Prix 4000 S II has 902 miles on it, and my rear tire has 1490 miles.

A screenshot of the Gear Tracking page of SportTracks fitness training software

I move the same bike indoors during the winter and use it on my direct-drive trainer. So I need to make some quick adjustments to how my bike gear is tracked when I transition to indoor training. I visit the Gear page of SportTracks and remove the following parts from being grouped with my bike:

  • Rear rim
  • Rear tire
  • Rear hub
  • Rear spokes
  • Rear wheel cassette
  • Rear brakes
  • Front brakes
  • Front tire

Note that I remove my front tire from the group, but not my front rim, hub or spokes. My front wheel doesn't spin when I ride the trainer, so I don't want to track miles on the tire itself. I'm still putting my body weight on the front rim, spokes and hub for the duration of my indoor training sessions. Those parts feel that pressure, so I track their use.

HOT TIP: Give your front wheel a little spin after every workout so you don't stress the same spokes on every ride, unless you have the KICKR Climb — in which case I'm jealous.

With those parts removed from my bike group, I then add my trainer and my trainer's cassette as part of my bike. Now my indoor trainer rides will automatically track the usage of my trainer and all of the other parts of my bike, except for the specific parts I excluded.

A screenshot of SportTracks endurance sports training software showing a Wahoo KICKR Core being added to the Gear Tracking page

Considerations for wheel-on trainers

With wheel-on trainers, like the popular Tacx Flow Smart, the rear wheel stays on the bike, but the tire is usually swapped out for a dedicated trainer tire. In this case, you should track the usage of your rims, hubs, and spokes, but you should remove your rear road tire from your bike group and add your dedicated trainer tire. Why track a tire that's only used indoors? So you can celebrate its birthday, of course!

How long will my gear last?

One of the main reasons to track your gear is to avoid overuse to the point where a part fails during a ride. This can be extremely dangerous, so it's best to do everything possible to avoid mechanical breakdowns.

It's critically important to inspect your bike regularly to make sure it's functioning properly. You certainly cannot rely on gear tracking alone to monitor your equipment. Rims, hubs and spokes will show signs of wear, and this should be your impetus to repair or replace them. It's still useful to know how many miles they have served you, though. Brake pads wear out at different rates depending on your riding environment and other factors. This chart only provides general estimates of how long parts last:

Road bike tires2500 miles (4000 km)
Cassette5000 miles (8000 km)
Chain2500 miles (4000 km)
Bottom bracket4000 miles (6400 km)
Disc brake pads1500 miles (2400 km)
Rim brake pads500 miles (800 km)

Now that my indoor training gear is all being properly tracked, I'll know my usage is accurate. I won't be adding unnecessary miles on my brake calipers, front tire, and other essential parts that will go unused for months. The parts of my bike that do get use will be tracked correctly, so I'll be able to service and replace them as needed. 

Do you have a different approach to tracking your indoor training gear? If so, we would love to hear about it in the Comments section below!

Community
http://cache.sporttracks.mobi/blog/images/2019/02/track-indoor-cycling-trainer-kicker-photo-cover.jpg

Pool Swim Editing

$
0
0

Today we've released a new feature that lets you take control of your indoor pool swim data. This essential tool lets you correct pool watch glitches for missed turns, stroke detection, false or missed starts, and more.

To access the editing tools for pool swims, click the familiar Edit button you know and love on your workout detail page. When the edit page is shown you'll see a new Pool Details tab for pool swims.

At the top of the Pool Details page you can change the size and units of the pool length. If you're swimming in different sized pools and forget to set this before your swim, this can be a useful option to fix that.

Below the pool length details is a list of all the recorded pool lengths organized into intervals, with the rest time between each interval. The pool length list shows the stroke type, duration, and number of strokes. A bar chart lets you quickly see where recording errors happened.

When you find the length you want to correct, click it to bring up a list of editing options. For example, if my watch missed a turn I can immediately find where it is because the time will be double and the bar will be twice the average length:

Clicking the length brings up the editing page, and I can click Split to break the length in half.

Similarly you can Merge two lengths if your watch messed up and detected a false turn in the middle as shown below:

Sometimes a pool watch will randomly detect the wrong kind of stroke. You can edit the stroke type by clicking the length and selecting the Edit option.

You can also edit the number of strokes or time if you need to make manual adjustments.

Finally if you need to remove an entire interval, change the rest time, or quickly change all the strokes in an interval to the same type, you can do that by clicking an interval row to edit it.

Conclusions

Modern watches do a good job of detecting turns and strokes while you're pool swimming, but they're not perfect, which can lead to inaccurate performance metrics and frustration. With these new editing tools you can take control of your data in the same place you analyze it. It's great!

How To
http://cache.sporttracks.mobi/blog/images/2019/02/edit-pool-details-cover.jpg

Boston Marathon Goals

$
0
0

I, like many of you, have a very exciting goal on my spring race calendar: I'm training for the Boston Marathon! And if you or someone you love is training for this race (or any marathon), you probably already know there is nothing people training for the Boston Marathon love more than (you guessed it!) TALKING ABOUT TRAINING FOR THE BOSTON MARATHON! That's why I'm here to share with my training routine and how SportTracks fits in. I think you'll find it relatable, inspirational, or at the very least, entertaining.

How I Got Here...

We'll start at the beginning: How I came to settle on this goal of running Boston. Running is a HUGE part of my life. It's the basis of my full-time job, the thing that makes me a nice, pleasant person, and the cornerstone of my social life. I'm lucky to have a wonderful, super-fun group of running friends to train with, so when they all decided to make Boston 2019 their focus there was no way I was going to miss out on the fun! 

I've run Boston twice before, a disappointing run that was quickly cancelled out by the tragedy of the bombings in 2013 and a perfect day that exceeded my expectations in every way in 2014. (This still stands as my marathon PR and I've done 3 other marathons since!) When I proposed the idea for this post to the SportTracks team their biggest question was "Why Boston?" I looked at them incredulously and replied "Because it's the best! Duh." And I really believe that's true.

A photograph of runner Ellen Moss from the 2014 Boston Marathon

Finish line photo by Nicki Dugan Pogue via Flickr

I've done eight other marathons, including the other two domestic majors (Chicago in 2016 and New York City in 2017), and although these were both great experiences in their own right, nothing beats the beautiful dichotomy of the intimate, supportive running community vibes and big rowdy crowd vibes that the Boston Marathon and the weekend surrounding it creates. As a fan of running and people and a hardcore extrovert I FRIGGIN' LOVE THAT STUFF! 

Also, I'm excited to return to the sighting of the ole marathon PR and see if I can best it. The Boston course is challenging. It's subtly to very noticeable downhill nature in the first ~16 miles can really trick you into going out to fast without realizing it until you hit the very inconsiderately placed Newton hills around mile 20. One of my very favorite and proudest accomplishments in my adult life is applying what I learned from a sad struggle up those hills in 2013 to crush those same hills and run a 7 minute marathon PR on the same course the next year. Here's hoping I can remember all those important lessons of the course to execute it well again this April!

And finally, all of my friends are doing it. Like literally, my entire running community, nearly every single person on my local track club (which I incidentally help manage through the running store where I work) is running Boston this year. I have had the honor and privilege of training with many of these fine people as they chased their BQs and even paced a few in the races where they earned them. So I'm thrilled to run Boston this year as part of my home team and to celebrate the culmination of lots of hard work for so many of my nearest, dearest running friends.

Goals and Training

Now, let's talk training! My time goal for Boston this year is 3:19:59 vs. my standing marathon PR of 3:21:28. Maybe it doesn't sound like all that much time to shave off, but I've done 3 marathons since running that PR and I've come up short of doing it (sometimes by mere seconds and others by several minutes). 

I work with a coach who plans my training program on a monthly basis, factoring in feedback from my daily training log and our monthly check ins. My weekly mileage for this training cycle thus far has averaged around 55 miles, with higher volume weeks topping out around to 60 to 65 miles. 

My training cycle is periodized into three week blocks which include two weeks of building volume (i.e. increasing mileage) and one step back week. On step backs I (mercifully) run less mileage, but will often see a ramp up in the intensity of the quality work prescribed.

Here is an example of what my typical training week might look like:

Monday: Rest

Tuesday: Easy miles (perhaps 5 to 7 of them) + strides.

Wednesday: Longer mileage (10 to 11 miles) with some sort of interval-based quality work (mile repeats, fartleks, etc.)

Thursday: Shorter easy miles (5 to 7)

Friday: Longer easy miles (8 to 10)

Saturday:  Short easy miles (4 to 6) + strides

Sunday: Long run with marathon paced intervals in the final hour. (16 to 22 miles)

The training calendar from SportTracks endurance sports training software showing a week of Boston Marathon planned workouts

The training calendar in SportTracks

I consider myself to be a fairly "low-tech" runner, but I would be nothing without my trusty Garmin 235 to track my mileage and pace and tell me my splits for those Wednesday interval workouts. I also rely on SportTracks to track my fitness improvements over time, measure my progress towards my goals, and keep tabs on my connections who are also training for Boston.

What the Stats Say

And speaking of other SportTracks community members who are training for Boston, the team at SportTracks HQ thought it might be fun to compare my goals for this year's race against the data of the SportTracks users who ran Boston last year. Here are the numbers...

Last year the Boston Marathon was a very popular race for SportTracks customers. Here are their demographics vs mine.

Age 

  • Them - From 30 to 68, averaging 49
  • Me - I'm currently 37, but by race day I will be 38.

Gender

  • Them - 90% male
  • Me - 100% female

Nationality

  • Them - 70% US, 30% non-US
  • Me - All-American

Distance Travelled

  • Them - Runners came from as far away as Italy (4000 miles), as close as Boston, US runners coming from all over the country.
  • Me - I'll be traveling 695 miles from Durham, NC to Boston.

Finish Time

  • Them - From 2:59:53 (6:51/mi) to 4:39:56 (10:14/mi), averaging: 3:30:12 (8:01/mi)
  • Me - I hope to finish the race in 3:19:59, which averages out to 7:38/ mile.

These statistics seem to be more or less reflective of my life in general, placing me somewhere on the higher end of average in pretty much every way. Stay tuned for a follow-up statistical analysis post-race to see how my actual performance stacks up against the SportTracks median.

Pro Tips for Newbies

If you're still reading this, it's probably pretty clear that I am REALLY STOKED for the 2019 Boston Marathon. I hope that's true for many of you out there as well. So I will leave you with some seasoned Boston Marathon advice, in case you're working on tackling this beast for the first time yourself...

1. DO NOT go out too fast: You will want to. The course is all down hill in the early miles and vibes are super-hyped and exciting. You may even think that you aren't going too fast in the early miles, but you'll be wrong. Remember that just because you feel comfortable running your goal pace or slightly faster in the first 8 miles or so doesn't mean you should be doing it. Run a few minutes slower than your goal pace for the first half of the race, and save that extra pep in your step. You're going to need it for the harder, later miles.

2. Kiss the Wellesley Girls: Just before the half marathon marker of the race you will run by Wellesley College. Here there will be hoards of screaming college girls bearing signs that say things like "Kiss me! I'm a Sagittarius!" or "Kiss me! I'm a vegan!" or "Kiss me! I'm from Nebraska!" etc. Stop running and kiss them, dammit! It's a Boston Marathon tradition and it won't effect your pace at all. I have the splits from 2014 to prove it.

3. It's better to come through the half slightly behind your pace than slightly ahead of it. A wise running mentor of mine told me before I ran my first Boston that if I came through the half ahead of my goal pace, I'd be totally screwed. It seemed a bit crass at the time, but I wholehearted believe it to be the best piece of Boston Marathon advice I've ever gotten. Hitting the half ahead of your goal time is a surefire way to run out of gas just when you need it the most: At the Newton hills. So hold your horses and enjoy the ride, at least through mile 13.

4. If you haven't fallen apart by Heartbreak Hill, then you're having a good day! It's easy to judge the type of day you're having in Boston by how big the hills feel. If Newton feels like it might as well be Everest, well, then the rest of the race is probably going to feel that way as well. (These things do happen to the best of us.) But if you make it to the top Heartbreak feeling fresh and peppy (or even if you just make it there feeling non-terrible) the day is yours! Go for the gold and relish a well-executed Boston Marathon! Just take care not to squander all of your speed and pep down the back side of Heartbreak into Boston College. Remember that you've still got 5 miles to go from there.

5. Have fun! It's the Boston friggin' Marathon, y'all! Regardless of your time goals, please, please, PLEASE allow yourself to have a little fun out there! You are running the best marathon with the best crowd support there is (in my humble opinion) and you have worked your tail off to get there! Live it up! Soak up all that great Boston energy! Take some selfies, stop and hug your family, laugh at the funny signs, high five the little kids! These are the things that will make your Boston Marathon experience awesome and memorable, regardless of the finish time you post!

In conclusion...

Writing this post has made me REALLY SUPER JAZZED for the Boston Marathon on April 15th. If you're training for it also, I hope it's done the same for you! Connect with me on SportTracks so we can swap training data and war stories, and I'll see you on Boylston!

Training
http://cache.sporttracks.mobi/blog/images/2019/02/training-for-a-new-pr-ellen-and-finish-line-cover.jpg

Polar Vantage V

$
0
0

We've become conditioned to the idea of planned obsolescence, where you buy the latest-and-greatest device today with the understanding that it will be out-of-date within a year, and the pressure to upgrade will begin again. Not every manufacturer espouses this approach, however, and in endurance sports tech, this is one of the qualities that sets Polar apart.

Their last flagship GPS multisport watch was the V800, which was announced way back in January of 2014. To put that in perspective, when it hit the market, two of its main competitors were the Garmin Fenix2 and the Forerunner 910XT. While Garmin raced ahead rapidly iterating on several model lines, Polar focused on the V800 and continued to fully support it and add substantial new features via firmware updates well into late 2017.

In September of 2018, the new Polar Vantage V and Vantage M sports watches were finally announced. The new line marked many big changes for Polar: an entirely new codebase, a shift to Sony-based GPS chipsets, and round watchfaces as opposed to square. With sports tech hardware, big changes usually bring with them periods of time where issues must be worked out. This has been the case with the Vantage series, but a series of firmware updates have corrected many problems and added useful features.

The Polar Vantage V multi-sport GPS watch with white band

The new Polar Vantage V feels as good as it looks

The higher-end Vantage V features the world's first wrist-based running power meter. Every other commercially available running power meter requires an external sensor such as a footpod or a chest strap, but the V doesn't need any additional hardware. I've used several running power meters, and the experience of having one built into your watch without any additional charging and pairing is a major advantage.

In addition to its marquee run power feature, the Vantage V has a touchscreen, five nicely sized buttons that make it possible to almost completely ignore the touchscreen, a barometric altimeter, a 9-LED optical heart rate monitor, and a powerful battery that provides up to 40 hours of continuous use with the GPS and heart-rate monitor running, which is impressive. It feels great, it has a durable metal body, and a Corning Gorilla 3 glass screen. It's premium throughout.

Differences between the V and the M

This review is focused on the Vantage V, but it's worth mentioning that the more affordable Vantage M is impressive in its own right. Most notably, it provides 30 hours of battery life with 1-second GPS and optical heart rate monitoring. The M doesn't have a built-in running power meter, but it's compatible with external run-power devices like the Stryd footpod (the Vantage V is also compatible with external running and cycling power meters).

Another differentiator is that the Vantage M lacks Polar's "Recovery Pro" features. As the name implies, Recovery Pro helps you monitor how well you recover from workouts to avoid overtraining. You need to have the separately available Polar H10 heart-rate strap to use Recovery Pro with the Vantage V, and you need to conduct several Orthostatic tests which can be carried out using the interface of the watch. We didn't have access to an H10 strap to try out this feature, but we're satisfied using mobile apps like HRV4Training and Elite HRV for similar feedback. However, like its built-in power meter, having recovery monitoring integrated into the watch creates an appealing, all-in-one solution for serious athletes.

There are more differences between the Vantage M and V: You can easily change the straps of the Vantage M with any 22mm interchangeable band, it weighs significantly less, it doesn't have a touchscreen, the buttons are not as high quality, and there is no barometric altimeter. Aside from these differences, the Vantage M can do almost everything the Vantage V can, making it an appealing mid-range multisport option.

Setting up and using Vantage V

After unboxing, ogling, and fully charging, it was time to get the Vantage V set up. One of the first things I did was to enable auto-sync between Polar Flow and SportTracks. This literally takes less than one minute to do: In SportTracks select your profile > push the "My account" button > select the "Sharing" tab on the left > press the "Connect" button at the top, then select Polar from the list. You're taken to Polar's site to authenticate and you're finished.

A screenshot of SportTracks endurance sports training software showing a successful integration with Polar Flow

Interesting aside, when you're setting up the Vantage V, it suggests using the watch on your non-dominate wrist. So if you're right handed, it suggest wearing the Vantage V on the left wrist for more accurate activity tracking. I took this suggestion to heart and wore the Vantage V on my left wrist, even though I always wear watches on the right wrist.

In addition to daily activity tracking, the Vantage V can also track continuous heart rate, track your sleep, and receive notifications from your phone. Judging from its classy visual appearance and all-encompassing feature set, the Vantage V is clearly a device that was designed to be worn all the time, not just for workouts.

Using the Vantage V for sports

Before I worked out with the Vantage V, I spent a little time on the Polar Flow website adjusting the sports profiles that I use most often. There are over 130 sports profiles to choose from, and you can  also customize them with the Polar Flow mobile apps (but not on the watch itself). I made a point to add my training zones and other physical information. This process was intuitive, fast and easy.

Getting familiar with the button layout to control the Vantage V was also easy. Everything makes sense, so the people out there who hate reading manuals will be happy using this watch. Most actions can be handled with the physical buttons, but, just like on a laptop computer, I found that I preferred to occasionally touch the screen for certain commands. The touchscreen is disabled when in sport mode, which is good, as sweaty fingers and touchscreens don't work well together.

DC Rainmaker and The 5K Runner have both written extensively about the accuracy of the GPS and heart-rate data from the Vantage V. In summary, it isn't currently as accurate as some competing devices. In my time using the Vantage V, I did notice that it would occasionally have inaccurate GPS tracks. However, every GPS watch I've ever used has provided inaccurate GPS data from time to time.

A GPS track from the Polar Vantage V multisport watch on SportTracks endurance sports software

The GPS track for this off-road trail run veers onto a highway, but the distance was accurate 

I tend to rely on running power and pace as my main running metrics, so I didn't notice anything unusual with the heart-rate data from the Vantage V. In various forums and blogs, I read about other people reporting heart-rate dropouts and spikes with this watch, but I didn't experience it myself. If you focus on heart-rate data for training and racing, it's definitely worth the extra effort of using a dedicated heart-rate strap as opposed to an optical monitor on your wrist.

If there's a fault against the heart-rate monitor in the Vantage series (both the V and the M have the same one), it's that it looks elaborate and advanced, yet it only provides average and acceptable performance. Polar has a good track record for improving their devices over time, so there's a chance it will get better in the future. But for now, it's just decent. I do appreciate how it records heart rate while swimming, and I also like how the metal charging contacts detect your skin and shut off the monitor when it isn't being worn.

The Precision Prime optical heart-rate monitor on the Polar Vantage V sports watch

Using Polar's running power

As I mentioned earlier, having a running power meter built into your watch is a superior experience compared to pairing a watch with external sensors. I've used the Stryd footpod extensively, and as expected, the run power numbers from the built-in meter on Vantage V were remarkably higher. For example, my target power for a typical 10K run with Stryd is around 260 watts. The same target with Polar's running power is around 325 watts.

One of the big drawbacks of using running power is that, unlike cycling, there is no standard measurement that all running power meters agree upon. So, an effort that's measured as 260 watts on Stryd is measured as 325 watts with Polar, and another completely different number with Garmin Run Power, and so on.

You also need to spend a lot of time with a running power meter before you start using the data for serious training and racing. You need to put in a few of months of runs just looking at the wattage, comparing it to pace and other metrics, and analyzing it post-workout. After a while, the feedback from the device becomes second nature, and you can start applying it to more effectively gauge your effort on uphills and flats.

I didn't have the proper amount of time it takes to fully delve into Polar's running power, but I did notice that it was consistent. I would be running along and think, "This effort feels like it's around 295 watts..." I would glance at the Vantage V, and I would be close to that number. That's exactly what you want. If you're already a Stryd user, you can use it with the Vantage watches, and you can set the watch to record GPS for your map, but use Stryd for power, distance, and pace. The fact that Polar goes out of their way to embrace third-party running power meters proves that your experience is their ultimate priority.

Closing thoughts...

Overall, I found the Polar Vantage V to be a high-quality multisport watch. The design, materials, and execution of the physical product are all top notch. If you've been using another watch platform and you're looking for a change, I think the Vantage series are worth a close look.

If you're already a devoted Polar user of the M400 or V800, you may find that the Vantage watches are still playing catch-up a bit, but they are making advances quickly. Completely rewriting the code for a model line that has apps for iOS, Android, Mac, PC, and a web app is no small feat. But even in the relatively short time I had the Vantage V, there were numerous firmware updates that made noticeable improvements to the device.

Wearable technology and fitness tracking has exploded in popularity in recent years, but Polar is no newcomer to this area. They're the opposite. Polar is a major innovative force that brought the first sports heart-rate monitor to market in the early 1980's. Like SportTracks, they're committed to improving and supporting their products for the long term. If this is a quality you want in your next watch purchase, you've found it.

Community
http://cache.sporttracks.mobi/blog/images/2019/02/hands-on-polar-vantage-v-watch-photo-cover.jpg

New Feature: Lap Button Editing

$
0
0

Any athlete knows that efforts are rarely consistent across an entire workout. Rides have flat sections and hill climbs of varying brutality. Interval workouts have active and rest sections. Threshold tests have warmup and cooldown. Or maybe you're mixing up your long run to include interval training before or after. Whatever the scenario, looking at your overall performance metrics won't give you a complete picture of workouts with mixed intensities.

A great way to analyze these workouts is to use the Intervals page to look at different metrics for different sections. You have a variety of common options for auto-distances such as 1 mile or 1km, intervals for auto-detected hill sections, and laps that you've manually triggered with the lap button on your watch or bike computer.

So what happens if you forget to trigger a lap, or trigger at the wrong place? A new feature in SportTracks lets you edit all of your lap details by clicking the workout Edit button and going to the Laps page.

To edit any lap, simply click the row. In the edit lap card you can change all the details of the lap or delete the lap.

Note that any lap fields that are left empty will be recalculated from sensor data (if present). No need to estimate the average or maximum heartrate for a lap — let the system do it for you. You can also add a lap by clicking the Add lap button at the top of the page.

Finally, if you just want to mark a lap as rest you can do that with one click on the lap number. This also works in the workout detail Intervals page without going into edit mode.

Triggered lap editing joins the long list of customization and editing features already available in SportTracks. It's another way SportTracks lets you take control of your own fitness data.

How To
http://cache.sporttracks.mobi/blog/images/2019/02/edit-laps-cover.jpg

The Incomplete Book of Running

$
0
0

Not-so-fun fact: Peter Sagal and I share the definitive life experience of being present at the 2013 Boston Marathon when the bombings happened. This, along with my long-time Wait Wait, Don't Tell Me fandom and general love of running sparked my interest in his new book, The Incomplete Book of Running. Imagine my pleasant surprise when it showed up under my tree on Christmas morning! I dove right into this easy-read and was done with it in time to welcome the new year.

The cover of Peter Sagal's book The Incomplete Book of Running

Tone and Voice

True to Wait Wait, Don't Tell Me form, Peter Sagal tells his story in a whimsical, lighthearted voice with nuggets of snark and humor that make even dark and heavy topics like divorce, depression, and mid-life crisis seem digestible and relatable. I read the old-fashioned, non-electronic version of the book myself, but in my head I could hear it being read in Sagal's radio voice, which gave it a bonus layer of authenticity.

April 15th, 2013

To me, this book’s most powerful story and the one that resonated with me the most was Sagal’s account of his experience at the 2013 Boston Marathon. Sagal's bombing story conveyed feelings of confusion, fear, sadness, anger, and a fierce calling to return to Boston to reclaim the race course in 2014. These were consistent with my own feelings and reactions having also witnessed this event.

He and the visually impaired runner he guided that year experienced the bombing in a much more up-close and direct way than I did. (They were essentially at the finish line when the bombs went off, whereas I finished the race about 30 minutes ahead of the explosions). The feelings of relief, amazement, and guilt I felt as I reflected on how things could have been different for me if any of the events of my run had unfolded differently rattled me to my core in the very way he describes in the book.

Life Lessons Taken from Running

All that said, you should know that this isn't just a story about the Boston Marathon bombing. Peter Sagal also examines all angles of his personal affinity for running. From his unhealthy relationship with it as a means of control as a self-conscious, chubby teenager to his reliance on the sport as a source of normalcy and therapy as an emotionally struggling middle-aged adult.

Over the course of the book he offers encouragement and advice for the beginner runner and chronicles his personal triumphs and disappointments as runner and their parallels to events in his life outside of running as well. All of this is standard issue, run-of-the-mill content for a book about running, but I think that Sagal's distinct dry, witty brand of humor and unique command of voice make his book more entertaining and infinitely less cheesy and annoying than the average inspirational running memoir.

Banditing: An Ethical Dilemma

Another highlight for me was the chapter where he very thoroughly examines the ethics of banditing a marathon. [Editor's note: banditing is when you run in a race without officially entering it]. Spoiler alert: Sagal bandited the 2011 Chicago Marathon as his final "supported long run" on the road to a breakthrough marathon PR in Philadelphia a month later. He blogged about this experience without giving it a second thought in his Runners' World training log and was shocked at the negative feedback his post received from his Runners' World and NPR followings and even his own mother! He presented his marathon banditing plight to ethics experts including a rabbi, a Harvard professor who was a "foremost expert on the moral philosophy of Immanuel Kant", and the Chicago Marathon race director himself! What was the ruling? You'll have to read the book to find out.

SIDE NOTE: In my non-SportsTracks life I work for a local running store, which also encompasses a race directing business. Thus, the morality of banditing races is hot-button topic in my day-to-day work life, so I have a special appreciation for Peter's investigation of this topic.

Final Thoughts...

Whether you’re a new runner, a seasoned marathoner, a person going through a divorce, a parent, someone who struggles with depression, an NPR fan, or any combination of any of these things, you will find some relatable themes and entertainment in this book. I found it to be a quick and easy read. I also thought it was a lovely reminder of the accessibility of running and its ability provide routine and stability at times when life feels utterly chaotic in every other way. It was a statement of how running builds communities and reminds us that we can do difficult things.

In fact, the running and life metaphors highlighted in this book are many, none of them are original, and all of them are at least somewhat cliché. However, at the end of the day they are still the reasons that I like running, and I thought it was nice to learn that they are the reasons Peter Sagal likes running, too. Maybe you'll appreciate this about The Incomplete Book of Running as well.

If you've also read this book, please let us know what you think in the Comments section below. Thanks for reading!

Community
http://cache.sporttracks.mobi/blog/images/2019/03/book-review-of-the-incomplete-cover-image.png

How to Use Planned Workouts

$
0
0

Do you ever look at your workout calendar on the first of the month and give a sad sigh because it's empty? It doesn't have to be this way! You simply need to put the "Planned Workouts" features in SportTracks to use. This post explains how to do it...

Note: This post was published in November 2013 and updated in April 2019 to add current features

With planned workouts you can lay out your training plan for a specific event or race, or plan your workouts for an entire season. Scheduling your workouts will keep you on track by letting you see how well you are meeting your goals. Seeing your upcoming workouts is also a great way to hold yourself accountable on those days you're not feeling inspired.

Creating a planned workout

To create a planned workout, switch to the calendar week view by clicking this week's bar chart in the dashboard:

The calendar chart from the dashboard of SportTracks endurance sports software

From the weekly calendar view, click the day number to add a planned workout. You can add a planned workout to any day from today forward.

A screenshot of the smart training calendar in SportTracks endurance sports software

The icon under the 9 above is the SportTracks Daily Notes feature

In the planned workout dialog you can set your sport type, date, time of day and goals. It's also a good idea to give the workout a unique name (emoji is supported). In the Steps tab you can create a dynamic custom workout (which you can then export to a Garmin device). In the Repeat tap you can schedule the workout to repeat daily or weekly. The Notes tab allows you to enter a training note about the workout. This dialog also lets you specify a flag color which will appear in the calendar:

The dialog box for creating a new planned workout in SportTracks endurance sports training software

You can create a primary goal of time or distance, and optionally specify a speed. If a speed is provided, the equivalent distance/time is calculated.

After you save the planned workout it appears in your calendar. The look is similar to a completed workout, but includes the flag, name, time and notes instead of data fields.

The weekly calendar view showing a planned running workout in SportTracks fitness software

Switching to the monthly view of the calendar, you'll see a smaller view of the planned workout. The name of the workout will be displayed as the goals you set, and the totals for each week are provided as well:

The monthly calendar view in SportTracks endurance sports training software showing planned running, swimming, and cycling workouts

On the monthly view you can also click a calendar day to create a planned workout.

Viewing your upcoming training plan

As you're adding your planned workouts, you'll want to review your total weekly volume goals and workout mix. The monthly view of the calendar is the best place to do this. For any weeks in the future, the weekly summary row at the bottom will show your time, distance and sport types

A screenshot of the monthly calendar view in SportTracks showing three planned workouts in a training plan

For additional details, you can click a planned workout, or flip over to the week view which provides slightly more info.

Another place you'll see your upcoming workouts is on the Dashboard. If you've added a planned workout a new section will appear at the top of the dashboard showing the workouts for the next week.

The Upcoming Workouts module from the Dashboard of SportTracks endurance sports training software showing the countdown of an upcoming running race and a planned 5K tempo run workout

You can click the planned workout to see details, to add additional notes, or to edit the date, goal, etc. You may also notice a delete button. You should only delete a workout if it was mistakenly added to your plan, not to mark it as "missed". If you're going to miss the workout there is nothing you need to do - as soon as you move past the workout date it will be marked as "missed" unless an actual completed workout is performed that matches the plan.

Read more about monitoring your training plan here.

How To
http://cache.sporttracks.mobi/blog/images/2019/04/planned-workouts-photo-man-running-cover.jpg

April Updates

$
0
0

Spring is arriving here in North America, bringing with it race season and a number of useful updates to the SportTracks platform related to races and performance modeling.

Race Countdown

If you have a race planned, you may have noticed a new feature appeared on your dashboard showing a countdown timer to your next race:

If you don't see a countdown timer to your next race, make sure to add the planned race to your calendar, and pick the "Race" type in the sub-sport for the run, ride or swim.

Health Chart Markers

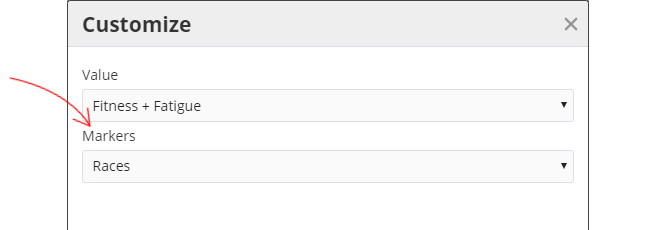
Over on the health page you can now add race markers to your charts. Our athletes requested to add this feature a while back and it makes a lot of sense. You can add race markers to any chart, but it probably makes the most sense on your performance charts. Moving your mouse over the marker shows the event details, and you can click it to zoom to the event:

To add chart markers click the settings gear in the upper right corner of the chart panel and select the markers you want to see. 

New Date Filters

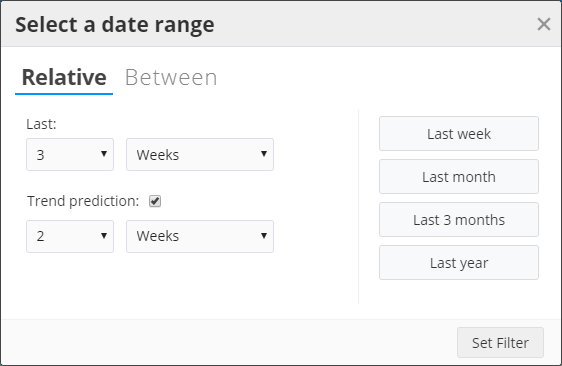
You may have noticed another change on the health page - the time filter links have been replaced by a button that opens the date selection dialog. Using the dialog you can pick any range of custom dates, or a relative period of time before today. Relative dates can be any duration of time based on a number of days, weeks, months or years. You can also totally customize a duration to show future predicted trends for performance modeling and health.

The date selection dialog is used in three other places: filtering the workouts in the analysis, workouts, and personal records pages. With this improvement you now have much more flexibility in customizing your reports to use relative dates. Enjoy!

How To
http://cache.sporttracks.mobi/blog/images/2019/04/select-relative-date-cover.png

How to Improve Running Cadence

$
0
0

Cadence is the number of strides you take per minute when you run, and since it's an easy metric to wrap your head around, it may be something you want to focus on for improvement. In a separate post we covered the basics of running cadence and what to look for when you analyze your data. In this post we look at methods for increasing your cadence, should you choose to do so.

The subject of training to alter your running form has opposing schools of thought. Some believe that trying to change your natural gait is unproductive and can lead to injury. Others have taken action to modify their cadence and experienced improvements in performance, without the downsides. We're not jumping into the debate here, but you should be aware it exists.

A word about accuracy

It's the same story with all training metrics: you want the most accurate data you can get. It's possible to measure your cadence manually by counting how many times a single foot hits the ground in 30 seconds and multiplying that number by 4, but this can be a distracting mental burden. It's a task better handled by tech.

Most decent running watches provide automatic cadence tracking, but it's usually calculated with GPS data. A solution that relies on orbiting spacecraft to count the number of strides you take each minute isn't ideal from an accuracy standpoint. Wearing a dedicated sensor locally on your body is the preferred way to go.

The Garmin Food Pod running sensor with a screenshot of SportTracks training software

The most accurate cadence device currently is the Stryd footpod, and it's compatible with a wide variety of running watches from various brands. The big downside is that it's expensive, but in addition to cadence Stryd also supplies running power data and other metrics. If you use a Garmin watch, the Garmin Foot Pod and the Running Dynamics Pod (which clips to your waist) are both good options and they're more affordable. If you use a Polar watch, the Polar Stride Sensor is available, and another popular low-price cadence tracking option is the Milestone Pod.

Find your baseline and increase 5% 

The first thing to do is to determine your current baseline cadence. An easy way to do this is to visit your SportTracks Workouts page and add the "Avg cadence" metric (if it isn't already displayed). To add it, just click the gear icon in the top right corner and select it. Next, filter the page by sport (Running), and look at your recent runs. There will be some variability, but you should be able to get a good idea of what your average cadence is.

As you train to improve, it's best to target a cadence that's only 5% higher than your baseline. So if your average is 160, target a cadence of 168 for training purposes. Do this for as long as necessary until 168 feels normal, and then train for a cadence 5% higher than that. Keep in mind that if you get into the 180 - 190 range, you are in the higher end of the spectrum, and training to go even higher will likely provide diminishing returns.

The Metronome Method

The metronomes that are used in music can be put to use in running, and if you own a smartphone (which you most certainly do), there are plenty of free metronome apps that will work for cadence training. An obvious downside is that you need to run with your phone (or another digital metronome device). As far as what apps to use, I tried out Guitar Tuna and liked it. PRO TIP: Adjust the time of the metronome to 1/4 beat.

Get started by running a 10-minute warmup at an easy zone-2 pace. Next, start your metronome and have it set to 5 steps faster than your average cadence. It can be beneficial to run in place at first with the higher cadence, to get yourself adjusted to the task of timing footstrikes with the beat. When you run at the higher cadence — you should not increase your pace. Maintaining pace while increasing cadence will give you a shorter stride length, which is what you want. After a minute of running at the higher cadence, up the rate of your metronome to 8 steps faster than average and run for another minute. Switch between these cadences 3 or 4 more times and then have a 10 minute cool-down.

The Music Method

If you like to run while listening to music, you should consider trying to increase your cadence by listening to uptempo tracks at specific BPMs (beats per minute). If you're a Spotify user, you can access a variety of playlists that are grouped by BPM. 

From the main screen of the Spotify mobile app, tap the Search icon at the bottom. On the Search page, scroll down the list of genres and tap on "Workout." There you will find a group of playlists categorized under "Running," and the name of each playlist will include the BPM range of the music. When you first get started, be sure to warmup first and cool-down after, and don't try to up your cadence over 5% of your current average, even if the more difficult playlists look more tempting.

The Custom Garmin Workout Method

If you use a Garmin watch, a great way to train to increase your cadence is to create custom multi-step workouts that target specific cadence ranges. It's easy to make these workouts with SportTracks and export them to your Garmin watch.

A custom multi-step structured workout in SportTracks endurance sports training software

You can learn how to create these workouts in our Garmin Custom Workouts post. Start with a warmup and then create "Active" steps with cadence ranges. When you do the workout, the screen of your watch will display your average pace for the step, the amount of time remaining in the current step, your current cadence, and the range you specified for that step (along with all of your normal data screens). This is the exact information you need to improve.

After you create a custom multi-step workout in SportTracks you can transfer it to you watch by connecting your USB charging cable to your computer. You can also send custom workouts from SportTracks to your Garmin watch wirelessly using this solution from Genius Wrist.

Got a method for increasing cadence that isn't covered in this article? We would love to hear about it in the Comments section below...

Training
http://cache.sporttracks.mobi/blog/images/2019/04/improve-running-cadence-female-runner-photo-cover2.jpg

Born to Run

$
0
0

I remember when Born to Run first came out back in 2009. On weekly group runs I listened to stories of the Tarahumara Indians and Barefoot Ted passed around. Of people extolling the virtues of forefoot running. I even tried barefoot running for a short while to see what it was all about. But somehow I was too busy at the time and never actually read the book. This month I finally had a chance to open it up.

Ten years after its initial publication Born to Run remains a top book for runners. The barefoot running craze came and went, Caballo Blanco rode into the sunset, and obscure ultramarathoners have parlayed their Copper Canyon fame into apparel companies. But how does the actual book hold up after a decade?

In Born to Run McDougall spins a yarn of an injury prone runner who becomes inspired with a new love of running. The quest starts after discovering an unknown tribe of Mexican Indians that can run hundreds of miles without rest or injury. Relying on the unfamiliar and exotic to suck the reader in, McDougall tells an entertaining and inspiring tale that meanders through a cast of quirky characters (ok, that's being polite, many are downright strange). The book is written in a conversational storytelling style, littered with light profanity, that allows the reader to give the author a bit of leeway about the truthiness of events. It's understood that this isn't Real Actual Dialogue™, and don't bother fact checking.

Moreover many things that seemed exciting and new in 2009 became commonplace in the last decade. Back then Vibram Five Fingers were so new that McDougall felt the need explain them to the reader (it's like gloves, for your feet!!) — a description that seems charmingly innocent in light of the class action lawsuit settled five years later. I actually had to google to see if they were still in business (they are: Vibram Affiliate Link).

...when I put the book down after the exciting climax (I won't reveal spoilers here) I was inspired to get out on my feet.

Barefoot running may not be as trendy as it was, but you'd be hard pressed to find a runner who hasn't at least heard of it. And you can buy sandals from Barefoot Ted himself! The mysterious Caballo Blanco got his own documentary posthumously in 2015. Scott Jurek went on to set a speed record thru-hiking the Appalachian Trail.

And what about the Tarahumara? The Copper Canyon Ultra is now a well known event that draws 700 locals and 150 visitors from Mexico and abroad.

As a result, someone plugged into the ultra running world reading this book 10 years later may be slightly less entertained. Still, it does provide an entertaining read, and when I put the book down after the exciting climax (I won't reveal spoilers here) I was inspired to get out on my feet. There's plenty of books on training technique, physiology and whatnot, but how many can actually inspire you? It's easy to see why Born to Run is a classic.

Grab a copy of Born to Run: A Hidden Tribe, Superathletes, and the Greatest Race the World Has Never Seen from Amazon.com.

Community
http://cache.sporttracks.mobi/blog/images/2019/04/born-to-run-cover2.jpg

The new Garmin Edge 530

$
0
0

Garmin just announced the new Edge 530 bike computer— their latest mid-level offering in this product line and a model that will likely become the most popular cycling device for the next two years. Replacing the Garmin Edge 520 and the 520 Plus, the new Edge 530 is packed with attractive improvements and a large number of appealing new features for road cyclists, triathletes, and mud-spattered mountain bikers too.

If you've been using an Edge 520, you're probably curious what improvements have been made. For starters, the battery life has increased to 20 hours (5 hours longer) and the screen got larger as well at 2.6" (63.5 mm) — the screen on the 520 is 2.3" (58.42 mm). The device itself also grew in size as the new 530 is noticeably longer at 3.2" (81.28 mm) — the length of the 520 is 2.9" (73.66 mm).

The Garmin Edge 530 bike computer

We covered the Garmin 520 Plus when it was announced last year, but one of the strikes against it was slowness. It just took too long to calculate routes. One of the big improvements on the new 530 is that the processor is twice as fast, which is a big deal. The marquee feature of the 520 Plus was the ability to handle turn-by-turn navigation, and the new Edge 530 has this capability as well.

The 530 can wirelessly connect to either ANT+ or Bluetooth Smart fitness sensors (such as Bluetooth heart-rate monitors), a capability that isn't supported on the 520 and 520 Plus. The Edge 530 has another new wireless skill: built-in WiFi. When you return to your home WiFi network after working out, the 530 will connect to your network and sync any new workout files automatically. This eliminates the need to sync with your smartphone to get workout files off of the device. And of course, when your WiFi network automatically sends your workouts to Garmin Connect, they will instantly be sent to SportTracks as well.

New Goodies for Roadies and Triathletes

The 520 was popular among road cyclists and triathletes, and they will surely appreciate the new ClimbPro feature, which displays the amount of climbing that remains on routes or courses that you've selected to ride. Climbs are color-coded to show intensity, and the current grade you're riding is displayed as well. Instead of grinding away blindly, ClimbPro lets you know how much work is left so you can more accurately gauge your attack. Plus, you can customize the other two data fields on this screen. ClimbPro is similar to an in-ride version of the Automatic Hill Detection feature in SportTracks. 

The Garmin Edge 530

Knowing how much gas you have left in the tank for climbs is similar to knowing how much you can attack before you blow up. There's a handy Connect IQ app for that called W' Balance, which is compatible with the Edge 530. You have access to all of the free data fields and apps in Connect IQ with the 530, which is a huge advantage of the Garmin ecosystem. Many apps and data fields in Connect IQ create unique metrics, which you can later analyze in SportTracks.  

If you're riding preset routes and courses, you can also enable Eat and Drink alerts. These will notify you to either eat or drink at certain points during your rides based on physical attributes like weight and the climate you're currently riding in. If you like it when a computer tells you to eat a banana, this feature is for you. 

For those who ride with a power meter, the Edge 530 can now display your Power Curve, which is a chart that compares your power output at certain durations. This kind of chart is useful for analysis after you work out. In SportTracks, any workout with power data has similar Critical Power charts. On your Workout Detail page, hit the Analysis tab and select Power from the dropdown menu. You can also overlay other metrics on this chart like Heart Rate, Cadence, Speed, and Grade.

The Critical Power chart in SportTracks endurance sports training software

The Critical Power chart in SportTracks is similar to the Power Curve chart on the Edge 530

The Edge 530 has the same "Extended Display Mode" feature that's found on other recent Garmin bike computers, like the compact Edge 130. This capability was tailor made for triathletes as it mirrors the data being collected on your Garmin watch on the display of the bike computer. This is ideal for brick workouts and races where you start in the water or on a run, and hop on the bike afterward. Instead of needing to start recording a separate workout file on your bike computer, the 530 will mirror the multi-sport data being collected by your watch. This requires a compatible Garmin watch like the Forerunner 645, 735XT, 935, or a fēnix 5 Plus.

Compelling New Features for Mountain Biking

While tarmac riders got new capabilities, the new Edge 530 offers many new features to those who ride off road. When you come to a fork or an intersection on a trail and stop, a new feature call Forksight will automatically display a map of your current location on the Edge 530. This data is pulled from the preloaded Trailforks app, and the map will show you the difficulty level and grades of the different turns you can make.

While Forksite is interesting, the new MTB Dynamics in the Edge 530 are perhaps a bit more head turning. They consist of new metrics called Grit, Flow and Jump. Grit is a score that's based on the difficulty of a ride, and it's largely influenced by climbing. Flow is a score that's based on forward momentum. Consider a downhill section, the less you brake, the higher your Flow score will be. Perhaps the most interesting metric is Jump. Immediately after you land a jump the Edge 530 displays your Hang Time, Distance, and Speed. It's pretty rad.

Features Any Cyclist Will Appreciate  

Whether your bike has drop bars, aero bars, or risers, you'll appreciate the new performance-related Altitude and Heat Acclimation features. Altitude Acclimation shows how well you're performing in changes of altitude, and Heat Acclimation shows how well you're performing in changes of temperatures above 71° F (22° C).

Immediately after you land a jump the Edge 530 displays your Hang Time, Distance, and Speed. It's pretty rad.

If you end up flying over your handle bars, the Edge 530 features automatic Crash Detection, which includes a "Get Assistance" function that automatically sends your location to the emergency contacts you add in Garmin Connect.

When you need to park momentarily to grab a coffee, you can enable a built-in bike alarm by long-pressing the power button. If the 530 detects movement, the alarm will sound. It can also send notifications to your phone, and your phone can automatically silence the alarm when you are in close proximity.

If the 530 falls off your bike somehow, or if it's buried behind a pile of lycra, you can use the new Find My Edge feature to unearth it. The moment it loses contact with your phone the Edge 530 will record its GPS location. To find it you to press a button in the Garmin Connect mobile app that makes the Edge 530 beep, and provides its last GPS location.

If you're the type of rider who needs more than 20 hours of battery in full GPS mode, or more than 48 hours of battery life when in battery-saver mode, you can use the separately available Garmin Charge Power Pack. This doo-dad attaches to the base of the 530 and effectively doubles the battery life. If you need a head unit for circumnavigating the globe on your penny farthing, the Edge 530 is an option.

Dismounting...

Taken as a whole, the new Garmin Edge 530 is a truly enticing new device. If you've been riding with a 520 for a while, there are enough useful new features and upgrades in the 530 to make it worth getting. Here's a summary of the new features and improvements:

  • Longer battery life
  • External Charge Power Pack support
  • Larger screen
  • Dramatically faster processor
  • Turn-by-turn navigation 
  • Support for Bluetooth Smart fitness sensors
  • Built-in WiFi
  • Real-time ClimbPro hill cimbing data
  • Eat and Drink Alerts
  • Power Curve charts
  • Extended Display Mode
  • Forksight trail navigation
  • MTB Dynamics: Grit, Flow, and Jump
  • Altitude and Heat Acclimation data
  • Crash Detection
  • Built-in bike alarm
  • Find My Edge (a way to find it if you lose it) 

If you were expecting Garmin to knock it out of the park on the next generation of this product line, it appears they have.

News
http://cache.sporttracks.mobi/blog/images/2019/04/all-about-garmin-edge-530-cover-image.jpg

The new Garmin Edge 830

$
0
0

Garmin just announced the new Edge 830 bike computer, completing a major update to their entire lineup of popular ride-tracking devices. It was unveiled on the same day as the new Edge 530, a model that shares a great number of features and capabilities. In fact, when you look at them side-by-side, the two seem almost identical physically. So, what exactly makes them different from one another, and why does the Edge 830 cost $100 more?

The face of the Garmin Edge 830 compared to the face of the Garmin Edge 530

Aside from the protruding side buttons, the Edge 830 looks nearly identical to the Edge 530

One of the main points of differentiation is how you control the device. The new Edge 830 features a touchscreen as the primary way to interact, whereas the Garmin 530 can only be controlled with its six hardware buttons. If you're the type of person who prefers using a touchscreen, the new Edge 830 may be the better choice for you.

Even though the touchscreen is the primary way to control the Edge 830, it has three physical buttons. A button on the left side can be used to power the unit on and off, to enter and exit sleep mode, and to lock the touchscreen. The bottom right of the Edge 830 feature a dedicated Start and Stop button, and the bottom left features a dedicated Lap button. Incidentally, if you've ever pressed your Lap button at the wrong time and wished you could correct it, SportTracks gives you a way to easily edit lap button data

The sides of the Garmin Edge 830 compared with the sides of the Garmin Edge 530 bike computers

The other way that the new Edge 830 differs greatly from the new Edge 530 is navigation. If you want to be able to enter in an address and have your bike computer provide you with turn-by-turn navigation instructions, you are going to want the Edge 830 — because the Edge 530 cannot do this.

In addition to inputing known addresses, you can also search the Edge 830 for Points of Interest (POI), and then get turn-by-turn navigation instructions to the location of your choosing. The Edge 530 doesn't have this searching capability, but you can select POI's from its map and get navigation instructions that way.

The major differences between these two new bike computers ends there. If having a touchscreen is important to you, then the additional $100 difference in price may be worth it. If unhindered navigation abilities are important to you, than the Edge 830 may be the better choice. If neither of these needs apply to you, then the new Edge 530 is likely the better choice.

We covered the announcement of the Garmin Edge 530 bike computer in a separate post, and took a close look at all of the improvements and new features. Since every single new feature and improvement is also found on the Garmin 830, you can check out that post to learn more about it. Here's a quick summary of these new features:

  • Improved battery life: 15 hours on the Edge 820, 20 hours on the 830
  • External Battery Support: works with the Charge Power Pack
  • Screen is larger: 830 screen is 2.6" (63.5 mm), 520 screen is 2.3" (58.42 mm)
  • Improved internals: the processor is twice as fast as the last generation
  • Bluetooth Smart fitness sensor support: works with Bluetooth heart-rate monitors, etc.
  • Built-in WiFi: sync new workouts automatically
  • ClimbPro: informs you of grade and other real-time hill climbing data
  • Eat and Drink alerts: help you stay properly hydrated and fueled
  • Power Curve charts: similar to the Critical Power charts in SportTracks
  • Extended Display Mode: displays workout data from watch, ideal for triathletes
  • Forksight: a helpful mountain biking navigation feature
  • MTB Dynamics: new metrics for Grit, Flow, and Jump
  • Altitude and Heat Acclimation data: help you understand how you're performing
  • Crash Detection: automatically notifies your emergency contacts
  • Built-in bike alarm: sounds when it detects motion, sends notification to your phone
  • Find My Edge: records GPS location of device when loses connection with phone, can activate a beeping sound when in Bluetooth range

Closing thoughts...

In a way it seems like Garmin wasn't sure if they should make a device that was primarily touchscreen controlled, or if they should make one that only had buttons. Instead of committing to a decision, they simply made both. Whatever the reason may be, it's nice to have more options. Both the new Edge 830 and the Edge 530 are compelling new cycling trackers, and the fact that they both automatically send their workouts to SportTracks means you can't go wrong with either one. ;)

News
http://cache.sporttracks.mobi/blog/images/2019/04/how-the-garmin-edge-830-is-different-cover.jpg

The new Garmin Forerunner 245

$
0
0

Garmin has finally updated their mid-level running-focused watch lineup with the announcement of the new Forerunner 245. There are two variants of this model: the 245 and the 245 Music, priced at $299 and $349 respectively. Both offer substantial updates and new features when compared to the last generation Forerunner 235. This article focuses on what makes this watch a compelling choice.

The Garmin Forerunner 245 sports watch with aqua band

The new Forerunner 245 Music features the ability to store and playback music to paired Bluetooth headphones. However, the music capability isn't the only thing that makes it different. The 245 Music also features built-in WiFi, which is needed to sync playlists from services like Spotify. The WiFi is also useful for automatically syncing new workouts to Garmin Connect and SportTracks without requiring you to pair the watch with your phone.

Besides music and WiFi, both new 245 models are the same. The sections below highlight the most important features...

New features and improvements on the Garmin 245

Improved Display

The color display on the Garmin 245 is now made of Corning Gorilla Glass 3 and is a complete circle, not squared-off on the top and bottom like the Forerunner 230 and 235. The resolution has improved as well, with the new 245 offering 240 x 240 pixels, whereas the 235 has 215 x 180 pixels.

Improved Optical Heart-Rate Monitor

If you look back at the high-end Fenix 5 Plus that Garmin released last summer, the heart-rate monitor on the new Forerunner 245 doesn't seem radically different. But if you look back to the last generation Forerunner 235 from late 2015, you will see how far it has progressed. The heart-rate monitor on the 235 wasn't the most reliable, so the Garmin Elevate heart-rate monitor on the 245 should be a significant improvement. It's the same heart-rate monitor that's found on the Forerunner 945 and Garmin's top-of-the-line MARQ sports watches.

Pulse Ox

Along with the improved heart-rate monitor is another feature borrowed from the Fenix 5X Plus, a wrist-based sensor called Pulse Ox. This is an advanced feature that measures oxygen absorbtion, which can tell you how well your body is adapting to exercise. It works best when you're not moving, and you can set the 245 to read your Pulse Ox as you sleep. The 245 handles complete activity tracking and sleep tracking, too.

Improved Battery Life

The new Garmin 245 can get up to 24 hours of use when in GPS mode, which is more than double the amount of life you got from the Forerunner 235. The 245 gets 7 days of life when in smartwatch mode, and when playing music and using GPS it will last for 6 hours.

UltraTrac Mode

If you want to do workouts that exceed 24 hours in length, whether it's an ultramarathon or an epic hike, you can enable the new UltraTrac Mode on the 245. This decreases the number of times the watch will write GPS points and use sensor data, but it greatly increases the battery life to record unusually long activities.

The Garmin Forerunner 245 running watch

Running Dynamics

When used with the separately available RD Pod or HRM-RUN or HRM-TRI bands, the new Garmin 245 provides Running Dynamics data such as Vertical Oscillation, Ground Contact Time, and more. These metrics are available the view on data screens as you run, and you can analyze this data after you work out in Garmin Connect and SportTracks.

Bluetooth Fitness Sensor Support

There are plenty of Bluetooth-related features in new Garmin 245, such as showing notifications from your phone, getting weather updates, and other smartphone features. What's new is that it's now possible to pair Bluetooth Smart fitness sensors, such as a Bluetooth heart-rate monitor, to use them with your 245. This wasn't possible with the Forerunner 235 and 230.

Galileo Support

New to the Forerunner 245 is support for the European Union satellite system called Galileo. Basically, when you set up your watch, you can choose to use just GPS satellites, or you can choose GPS + GLONASS which includes the Russian satellite system, or choose GPS + GALILEO. What this means is that if you look at your map data and think it could be more accurate, you can switch to these various satellite systems and find the ones that work best for you.

Basic Navigation

Another feature not found on the old Forerunner 235 and 230 is navigation. The new 245 doesn't have full maps like the new Forerunner 945, but it does provide a way to view your path on a map, to save locations, and it can give you instructions to navigate your way home.

Assistance Alert and Crash/Incident Detection

If you accidentally crash on your bike, or stumble and fall on a run, the Garmin 245 can alert your emergency contacts and provide them with your last GPS location. Plus, if you haven't had a traumatic crash or fall but you still want to let your emergency contacts know where you are, you can hold down a button on the 245 to do so. These features require that you have your phone with you.

Lap Swimming Support

While it was possible to use Connect IQ apps to record pool swims with the Forerunner 230 and 235, this workout type is now officially supported in the new 245. It can record pool swims, but not open water swims nor scuba dives. The Garmin 245 provides pool lengths, swim intervals, stroke count, stroke types, and SWOLF

Other new goodies in the Garmin 245

Virtual Partner - You can add a "Virtual Partner" data screen to an activity to try to maintain a specific speed or pace. You can even race against it.

Improved Predicted Race Times - This feature was in the Forerunner 235 and 230, but it's been improved because in addition to VO2 Max, it also looks at your training history and other data sources.

Metronome - While it was possible to add a metronome to the Forerunner 235 and 230 via Connect IQ, a metronome is now included with the new Garmin 245. This is a useful tool for training to improve your cadence.

Configurable Lap Banner - You know those notifications you get every time you complete a mile or kilometer? You can configure the data that's displayed on this banner to your liking with the Garmin 245. There is also a lot more configurability found throughout the Forerunner 245.  

Final thoughts...

There's a lot to like in the new Forerunner 245. The bigger picture items are great, such as the improved heart-rate monitor, improved GPS, improved battery life and so on. There are also plenty of little things to appreciate, like the new all-day stress tracking and Body Battery features, which make the 245 an excellent wear-at-all-times fitness tracker.  

The new Forerunner 245 will likely be the best all-around mid-level sports watch you can get. And while it is appealing, it doesn't have everything we want. For example, it lacks a barometric altimeter, which means that as good as an activity tracker as it may be, it cannot count stairs. This also means that it can't use Garmin's Running Power, which is a bummer. But even with its shortcomings, the new Forerunner 245 is going to be the perfect watch for a great number of people.

News
http://cache.sporttracks.mobi/blog/images/2019/05/all-about-garmin-forerunner-245-cover.jpg

The new Garmin Forerunner 945

$
0
0

It's been over two years since Garmin introduced the Forerunner 935, a multisport watch with powerful capabilities housed in a race-friendly compact and lightweight body. As appealing as it was, as time marched on the 935 started to lack many of the features found in more recent Garmin watches, such as music storage and contactless payments. The new Forerunner 945 was just released, and it fills in the holes of these missing features, and adds new functionality on top.

The Garmin Forerunner 945 with a map on its screen

Some product updates bring sweeping changes with complete physical redesigns and new approaches to how they operate. This happened when the popular Garmin 920XT was replaced by the Forerunner 935 in 2017. Nearly everything was different from device to device. This is not the case with today's update from the 935 to the 945. These watches are nearly identical. The buttons, buckles, and optical monitors look slightly different, and that's about it. But that's okay because the 935 was a much-loved watch, and the 945 just continues its legacy.

Even though the physical appearance hasn't changed much, there's a lot of new functionality in the Forerunner 945 that we explain in the highlighted sections below...

New features and improvements on the Garmin 945

Full Map Navigation Built-In

The marquee features of the 945 may be music and payments, but the inclusion of full map navigation is the biggest standout feature to us. Music and payments are only useful for certain types of people, while pretty much everyone can appreciate a helpful map. The Forerunner 945 comes preloaded with maps of your geographical region (USA, Europe, etc.). Without an internet connection you can see your location, get turn-by-turn navigation instructions, navigate to Points of Interest and saved locations (like your home), and more.

Music Storage and Playback

If you like to listen to music or podcasts while you workout, but don't like being forced to use your smartphone or music player to do so, the new 945 has you covered. The watch has 16GB of storage, but you only get access to around half of it for your audio content. You can pair your Bluetooth headphones and transfer favorites from your music library via USB, or sync playlists from services like Spotify via WiFi. Speaking of WiFi, when you arrive to your home wireless network after exercising, the workout files on your 945 will automatically upload to Garmin Connect, and auto-sync to SportTracks as well. 

Contactless Payments

Even though the Forerunner 945 is all about sports, sports, and sports — the biggest new features are all about music, maps, and money. The 945 features Garmin Pay NFC payments. If you're at a store you can choose to hit a button on your watch in order to pay for your goods. There's probably a fair number of people who don't care about this at all, but even though it may seem like pure gimmick, contactless payments on a wearable is actually a handy feature to have. Sometimes you just don't feel like digging your bank card out of your wallet, and if you're working out without your wallet, you can still stop and make purchases. Your bank needs to be supported in order for this feature to work, but there's a decent amount of them now.

Improved Heart-Rate Monitor

One of the few physical differences on the new 945 is its array of optical sensors. This section houses the new Elevate heart-rate monitor, and the Pulse Ox sensor. The heart-rate monitor marks a gradual improvement over the wrist-based sensors Garmin released on the Fenix 5 Plus watches last year. So while this new heart-rate monitor isn't radically different from what you got on the old Forerunner 935, it's incrementally better, which is still a good thing.

Pulse Ox

The Pulse Ox sensor measures oxygen absorption, which can tell you how well your body is adapting to stress and exercise. It works best when you're not moving, and you can set the 945 to read your Pulse Ox as you sleep. Pulse Ox was an advanced new feature that first debuted on the Fenix 5X Plus last year. It's also included on the new Forerunner 245 as well.

A photo comparing the back of the Garmin Forerunner 945 and 935 triathlon watches

The optical sensors and the styling of the buttons and buckle are the only exterior physical changes

Improved Battery Life

Sure, the new 945 looks an awful lot like the old 935, but it has different internals. The new Forerunner 945 utilizes a more recent Sony chipset, which provides more efficient operation. One tradeoff is that the GPS data isn't as refined as it is on the older 935 (but that will likely improve over time). The good news is that the battery life has increased an impressive amount. The new Garmin 945 gets 36 hours of life in GPS mode, and 60 hours of life in UltraTrac mode (the 935 gets 24 hours in GPS mode, and 50 hours in UltraTrac). 

Crash and Incident Detection, Assistance Alert

If something bad happens to you during a workout, such as a bike crash or a hard fall on a run, the Forerunner 945 can automatically alert the emergency contacts you set up in Garmin Connect. Similarly, if you sense something creepy going on when you're out on a workout, you can alert your emergency contacts even if you haven't crashed, so they know where you are and can come to your aid if needed. Both the Crash Detection and Assistance Alert features require that you have your phone with you.

Heat and Altitude Acclimation

The new Garmin 945 comes loaded with new performance-related Altitude and Heat Acclimation features. These are metrics that let you know how well you're adjusting to changes in your environment. In order for them to work, you need to pair your watch with the Garmin Connect mobile app at least 3 hours before a workout, so the information is present to calculate the data. As the names suggest, Altitude Acclimation shows how well you're performing in changes of altitude, and Heat Acclimation shows how well you're performing in changes of temperatures above 71° F (22° C).

Other notable updates to the Garmin Forerunner 945

ClimbPro - This is a cycling feature that displays the amount of climbing remaining on a route or course you've selected to ride. Climbs are color-coded for intensity, and your current grade is displayed. It's similar to an in-ride version of the Automatic Hill Detection feature in SportTracks. 

Respiration Rate - This is a brand new metric that Garmin has yet to completely explain. The current manual for the 945 only states that it's "Your respiration rate in breaths per minute (brpm)." You can add Respiration Rate to display on the 945. 

Stress Tracking and Body Battery - Like the 935, the new Garmin 945 was designed to be a watch you can wear all day and use as a smartwatch and activity tracker (and get notifications from your smartphone, etc). New Stress Tracking and Body Battery metrics keep track of how much stress you're enduring, and measure how much energy you've spent throughout the day.

Improved Race Predictor - The Race Predictor feature has been included in many Forerunner watches over the years, but the latest version found in the new Garmin 945 has been improved because in addition to VO2 Max, it also looks at your training history and other data sources to calculate a more accurate prediction.

Closing thoughts...

The Forerunner 935 was the go-to watch for a great number of serious endurance sports athletes, and before that the 920XT was the one to use. All signs point to the new Forerunner 945 becoming the watch of choice for this crowd. If you don't need a timepiece that can be worn with fussy business clothes in a professional office, like the Fenix and MARQ series, the new Garmin 945 should be a top consideration. You likely won't need to use all of the features it provides, but you will find that it does an exceptional job with the features you do want to use.

If you're interested in an advanced sports watch like the Garmin 945, you likely appreciate more performance-focused training and racing tools. Quality hardware is a key part of this pursuit, but the software you use is equally important. Garmin makes some of the best hardware available, but their cluttered Garmin Connect software falls short in many regards. That's why serious athletes seek out a better solution, and SportTracks is their platform of choice. It's cleaner, more powerful, and far easier to use. Try it yourself with this 45-day free trial — you will not be charged when it ends.

News
http://cache.sporttracks.mobi/blog/images/2019/05/all-about-garmin-forerunner-945-cover.jpg
Viewing all 221 articles
Browse latest View live