Quantcast
Channel: SportTracks blogs
Viewing all 221 articles
Browse latest View live

GPS Sports Watches: Key Features

$
0
0

If you’re new to fitness tracking with GPS sports watches, you may be wondering how to get the most out of your new device. That’s what this series of articles is all about. If you haven’t checked out Part One, give it a read. In this post, we cover advanced features, and explain how they can be leveraged to benefit your training — even if you’re a total newb.

When you’re comfortable tracking and uploading workouts, it’s time to get adventurous and explore the other features of your watch. The device may seem somewhat simple on the surface, but there are many powerful features just a few button presses (and beeps) away.

Embrace your pace

Without a doubt, pacing features are some of the most useful and important tools in your watch. Modern GPS sports watches often provide a variety of ways to track pace, most of which can be useful depending on your current needs.

It's equal in importance to the speedometer and the fuel gauge of a racecar, combined.

If you’re not familiar with the term, pace is the amount of time it takes you to complete a mile or a kilometer. Pace plays a huge role in endurance sports. It's equal in importance to the speedometer and the fuel gauge of a racecar, combined. Pace lets you know how fast you’re going, and how hard you can push it for long distances without running out of gas before you reach the finish line.

The most basic way to display pace on a GPS sports watch is to show your current pace in real time. This is a good way to know how fast you're presently travelling, but many athletes also heavily utilize averaged pace modes.

Garmin sports watches have a mode called Average Pace, which, as the name implies, displays your average pace for an entire workout. This number is extremely important in long distance efforts where you need to maintain a target pace for long stretches of time.

Lap Pace is another popular averaged pace option. It displays your average pace, but only for the current lap. This is a good way to gauge your current pace on a given portion of a workout (such as a lengthy hill), with the focus being on your current effort level as opposed to the average from your entire workout.

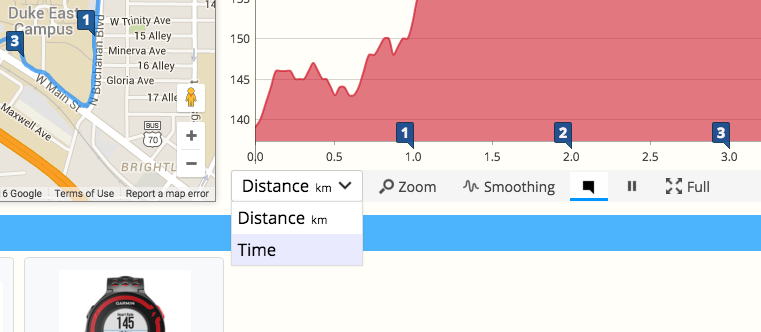
Looking at pace in your post-workout analysis is enlightening as well. SportTracks provides your Average Pace, Max Pace (the fastest pace you acheived), and Level Pace (which estimates how you would have performed on a flat course with no hills). Max Pace is interesting becuase the fastest moment of your workout isn't always where you thought it was. Level Pace is useful because you may be training for a race with a relatively flat course in an area with more hills.

However you decide to use it, it's strongly advisable to dig deeply into the pacing features of your watch. If you're training for a marathon, an Ironman, or even just a 5K, the pacing tools in your GPS sports watch are essential.

Learn how to use the Personal Records Timeline in SportTracks to help determine your marathon goal pace in this post.

Tap the lap

The nice thing about the word lap is that you already know what it is. However, with a GPS sports watch, a lap doesn't have to equal a spin around the track at the schoolyard. A lap can be a wide variety of distances, depending on your needs.

Laps are recorded two ways: automatically and manually. Your watch likely arrived out of the box set to a default length for automatic laps. If you like, you can go into the watch's settings and adjust the automatic lap distance to your liking: 1 kilometer, 2 kilometers, 1 mile, 2 miles, etc.

You can also manually enter laps using the Lap button on your watch. Why would you enter laps manually when your watch will do it for you? There are a veriety of reasons. Perhaps you're working out at a park, and the park has a trail that loops. The distance of the loop isn't a complete kilometer or mile. When you complete your first lap around the trail, hit the Lap button. Do the same for all subsequent laps until you're finished. In your post workout analysis, you will be able to clearly see how you perfromed on each split.

It can also be helpful to manually enter laps when doing an all-important interval training session.

The integral interval

Interval training is a fundamental method for improving your speed and strength as an athlete. It breaks your workout into sections where you go quickly for a specified length and then slow down to let your body recover. This process repeats, and these workouts are often bookended with warmup and cooldown sections.

Check out the features on your watch. If it has built-in interval training, you should definitely try it out, and consider incorporating it into your regular routine. If you don’t find interval training features in your watch, you can still execute these drills, you just won’t have automated alerts to speed up or to take a break, or to let you know that you’ve unwittingly slowed down.

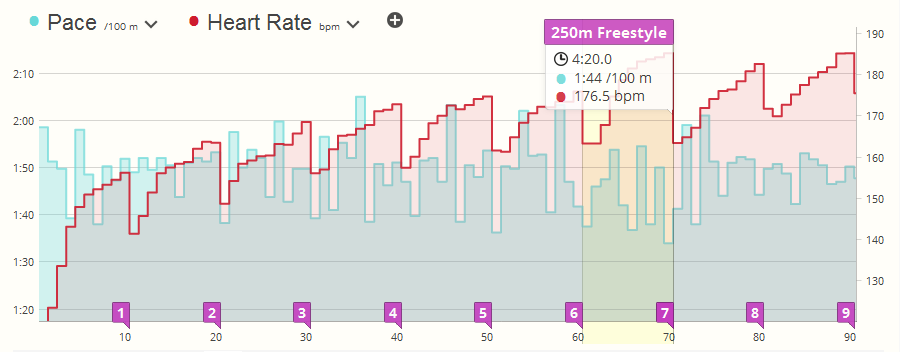
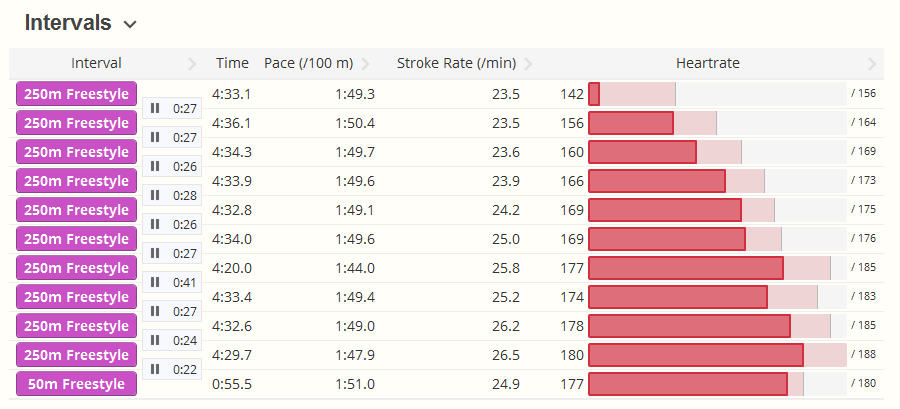
In regards to interval analysis, SportTracks enables you to compare your automatic or manually recorded laps and by time, pace, elevation, heartrate, cadence, and energy. It also enables you to take the same data and split it up by distance (different increments of meters, kilometers, or miles), or hills. In fact, SportTracks has the unique ability to automatically detect hills. If you're on a run or a bike ride, you will be able to analyze hills without having to mark them manually with the lap button. This enables you to concentrate completely on performance in the moment, and get detailed insights afterward.

Got endurance race aspirations?

If one of the reasons you bought a GPS sports watch was to complete a marathon, duathlon, or triathlon — you're on the right track. Your device is going to be an important part of your training. If you want to enter an endurance race with a somewhat short amount of time to train, be careful not to overdo it. It’s easy to injure yourself by overtraining. A proven way to avoid injury in endurance sports is to hire an experienced coach to guide you.

Your coach can start a free account which enables them to access your SportTracks calendar to create a training plan for you. As you complete each workout, your coach can analyze your performance and leave notes. You can also send personal messages back and forth. SportTracks will even inform you if your coach reviewed a specific workout or not.

Where to go from here?

The best advice we can give is to enter a short-distance race that's scheduled to take place in a few months. It's advisable to visit a doctor first and ask if they think you're in good enough physical condition. Seriously... Even if you haven't completed a single workout, we urge you to sign up for a race. If the thought of it makes you nervous, throw those feelings in trash. Races consist primarily of excitement and fun.

Even if you haven't completed a single workout, we urge you to sign up for a race.

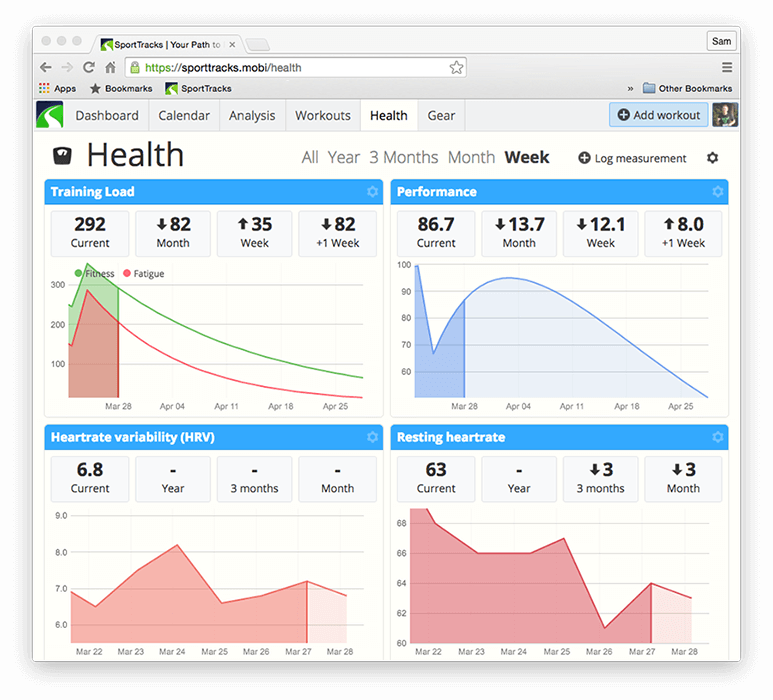
Having an event to train for is the greatest motivator there is. It gives you a chance to create and follow a training plan, and if you really want to see how your watch will give you a competitive edge, you can taper your fitness to be in prime shape for race day. Perhaps we're biased, but we think the best tapering tools in existence are the Training Load features in SportTracks. You can try them for free, and you don't have to worry about being charged. When you signup, you get an all-access 45-day trial that will give you ample time to test these features out.

We would like to sincerely welcome you to the world of advanced fitness tracking tech. We hope you enjoy training with GPS sports watches as much as we do. Cheers!

P.S. It's a shame you didn't get the purple version of that watch. Waaaaay cooler looking.

:)

Training
http://cache.sporttracks.mobi/blog/images/2016/01/key-features-background.jpg

How to Start Zone-Based Training

$
0
0

The topic of training with “zones” comes up quite frequently in fitness, however, finding a clear explanation of what exactly it is can be elusive. It’s also unclear how you can start using zones, and why they’re so beneficial. This is precisely the goal of this post. Let’s go…

What is zone-based training?

Zone-based training splits your various effort levels into separate, organized and labeled zones. When used properly, they enable you to take full advantage of specific training methods that help you improve as an athlete. You can monitor your zones in real time as you work out with a tracking device, and then deeply analyze them with software afterward — enabling you to make informed decisions about how to advance your training.

Most athletes mainly concern themselves with Zones 1 through 5, which cover the levels of exertion between easy, non-taxing efforts to extremely intense efforts that you can only maintain for short periods of time. For example, in running, walking slowly is categorized in Zone 1. A brisk walking pace is also categorized in Zone 1, however, it’s closer to Zone 2. Zone 5 is an all-out sprint.

Zone training can be based on your heart rate, pace, and/or power. Power is exclusive to cycling, and it requires a piece of equipment called a “power meter”. You can learn more about power-based training in cycling in this post.

How are zones used?

Zones are used in many different ways, depending on the type of training being done. If you’re training for a half marathon, you may follow a plan that primarily focuses on Zone 2. Besides established training plans, zones are also commonly utilized in general fitness. For example, in interval workouts, athletes often target specific zones for different segments. 

How do I get started in zone training?

The first step is to accurately measure your current training zones. In this article we'll explain how to determine your heart rate zones for running and cycling, as well as your pace zones for running.

Fitness tools like GPS sports watches and training software like SportTracks come set to default zones. In order to start using training zones in earnest, you need to determine your “threshold zones”, and then adjust these default zones accordingly.

What the hell is a threshold zone?

Think of a threshold zone as your personal tipping point. If you exceed a threshold zone for too long in endurance sports, you will wear yourself out prematurely. The most common type is your Lactate Threshold Heart Rate, or LTHR.

When you’re working out and pushing hard, you will reach a point where your muscles start to burn, and the only way to decrease the burning is to slow down or stop completely. The burning sensation is caused by your body not being able to clear away “lactate acid” from your system quickly enough. However, if you know your current LTHR, and you can monitor it while you work out, you can push yourself right up to this threshold for as long as possible to put in your best effort.

How can I determine my zones?

The most accurate way to determine your current threshold zones is to visit a professional sports laboratory, however, this method costs money, and not everyone has access to a qualified facility. Another proven way is to measure them yourself. Thankfully, it’s possible to accomplish this with basic equipment and an hour of free time.

How to conduct a threshold zone test

In order to determine your heart rate and pace thresholds, you need to execute a 30-minute workout where you go as fast as you can, non-stop on a flat course, while tracking with a GPS watch, bike computer, or a mobile fitness app. Wearing a heart rate monitor is required to determine your LTHR (more information on this test can be found in this post). An indoor trainer for bikes or a treadmill can also be used.

When you conduct this test yourself, don’t go slow for the first 10 minutes and then harder for the final 20. Do your best to move at an even level of exertion the entire time, while still pushing as hard as you possibly can without slowing down.

Your average heart rate from the final 20 minutes of this test is your LTHR. Your average pace from the entire 30 minute test is your pace threshold. You can find these averages by uploading your workout to SportTracks (non-subscribers can easily use the free 45-day trial).

How you find your LTHR in SportTracks:

1) After uploading this workout, select it from the Dashboard in SportTracks
2) In the bottom left corner of the graph, change “Distance” to “Time”


3) Hover over the 10-minute mark at the base of the graph, then click and drag to the end (which should also be the 30-minute mark)


You can now see your average heart rate for this portion of the test. It's worth noting that pressing the "Lap" button on your device at the 10 minute mark during the test is unnecessary if you're analyzing the results with SportTracks.

How to determine your zones from the test data

I recently tested my own LTHR and pace zones for running. I ran on an outdoor gravel trail that wasn’t perfectly flat, but flat enough for this test. My average heart rate from the final 20 minutes of the 30-minute workout was 164. My average pace from the entire workout was 5:55/km.

Here’s how to determine the training zones from this data:

For heart rate, anything less than 85% of your LTHR will be Zone 1. Since my average heart rate was 164, 85% of 164 = 139.4. So, for me, anything lower than 139.4 will be Zone 1.

Here are the heart rate and pace training zones for running and cycling:

Running Zones based on LTHR
Zone 1 = Less than 85%
Zone 2 = 85 to 89%
Zone 3 = 90 to 94%
Zone 4 = 95 to 99%
Zone 5 = 100 to 104%

Cycling Zones based on LTHR
Zone 1 = Less than 81%
Zone 2 = 81 to 89%
Zone 3 = 90 to 93%
Zone 4 = 94 to 99%
Zone 5 = 100 to 102%
Zone 6 = 103 to 106%
Zone 7 = Over 106%

Running Zones based on Pace
To determine pace zones, I need to do some math. I'll start by first converting my mm:ss threshold pace to a decimal pace by dividing 55 seconds by 60 = 0.92. It's best to round your average pace to the nearest tenth. Since my threshold pace was 5.92/km I rounded this to 5.9. Zone 1 is anything slower than 129% of your threshold pace. 129% of 5.9 = 7.61. To convert this decimal to a mm:ss pace I need to multiply the .61 by 60 seconds = 37. Our final result is 7:37, so, Zone 1 is 7:37/km and slower for me. You can use this same approach for pace /per mile; the math is identical.

Here are the pace zones for running:

Zone 1 = Slower than 129%
Zone 2 = 114 to 129%
Zone 3 = 106 to 113%
Zone 4 = 99 to 105%
Zone 5 = 97 to 100%

How can I use this data?

When you know your zones, you can start applying them. As mentioned previously, many endurance training plans lean heavily on Zone 2, even though this effort feels like a light jog. Zone 5 is demanding, but intentionally working out in this zone on a regular basis can dramatically improve your fitness. A basic Zone 5 workout could have a 10-minute warm up in Zone 2, followed by 15 minutes in Zone 5, and conclude with a final 10-minute cool down in Zone 2.

Interval training is an excellent way to improve as an athlete, as we discussed in our article about the key features in GPS sports watches. As you get more involved in interval training, you will likely want to target, hit, and maintain specific zones during the separate segments of your intervals.

Conclusion

Hopefully this article has provided you with a better understanding of the basics of zone training. It’s a rather deep topic. Explaining it is like unraveling yarn from a sweater. But, they’re powerful tools that both beginner and experienced athletes should definitely embrace.

Speaking of sweaters, I don't recommend wearing one during your threshold test. It was 41 degrees fahrenheit when I did mine. I was wearing summer running clothes, and after the first seven minutes I didn’t regret it. :P

Training
http://cache.sporttracks.mobi/blog/images/2016/01/zone-training-cover.jpg

Introducing #SportTracksScenes

$
0
0

We want to see you — the SportTracks community — in action! Starting next month we’re swapping out the background photos on the SportTracks login page with pictures submitted by our community. If you want to appear on our login page, share your photos on Facebook, Instagram, or Twitter, and include the contest hashtag: #SportTracksScenes (complete instructions are below). If your photo is chosen, you get a free year of SportTracks!

The contest runs from January 13th through February 17th 2016, 17:00 UTC. The number of available prizes are limited, so don’t miss your chance to win! In addition to your photograph, a link to your SportTracks profile will also be included on the login page. 

What kind of photos are you looking for?

We want snapshots of the SportTracks experience. It could be an image of you training for or competing in a race. It could be a photo of you stretching before or after a workout. Pictures of your equipment could also work, such as nice looking shots of your bike. It could even be photographs of the places that you work out. We want anything that evokes the SportTracks experience. Get creative!

How do I enter my photos?

Submit photos through Facebook, Instagram, and Twitter. On Facebook, visit the SportTracks Page and upload your photo on our wall remember to write the #SportTracksScenes hashtag in your post. On Instagram, be sure to include the #SportTracksScenes hashtag and our @SportTracks handle in your caption. On Twitter, write the #SportTracksScenes hashtag and our @SportTracks handle in your tweet.

How many times can I enter?

You can submit as many photos as you like. Multiple entries are encouraged! Just be aware that we will not award more than one free year of SportTracks to a participant.

To learn more about the terms of the contest, visit the #SportTracksScenes page:

#SportTracksScenes

We look forward to seeing you in action!

Community
http://cache.sporttracks.mobi/blog/images/2016/01/intro-scenes-cover-get-on-bike.jpg

Swim Heart Rate Analysis

$
0
0

Today we announce full support for the Garmin HRM-TRI and HRM-SWIM heart rate monitors, along with features to display and analyze heart rate during swim workouts. Suunto users – we haven't forgot you. Read on for a new surprise we've added for Ambit3 users...

Garmin HRM-TRI and HRM-SWIM bands

While Garmin started shipping the new HRM-TRI and HRM-SWIM bands in fall 2015, those bands unfortunately included a new technical glitch – all the heart rate data was recorded in a new format. This meant partner apps like SportTracks couldn’t read it, and customers were stuck with the rather basic Garmin Connect, limiting the depth of advanced technical analysis they could do.

SportTracks is now the first and only partner app to support the new Garmin HRM straps. This new support, combined with the best in market solution for analyzing pool swims, gives athletes a powerful tool for improving swim performance.

Full precision sampling

Our support for swim heart rate and amazing pool stroke analysis is just the start. Here is another technical detail you might miss: In some scenarios, due to GPS loss or sensor sample frequency, you’ll find your heart rate data loses precision on the Garmin Connect website. Not in SportTracks – we’ll store your HRM data at one-second precision, just as it was recorded by your HRM.

Suunto Ambit3 love

And that’s not all, you’ll also get this set of seven steak knives absol…

j/k

But we’re not kidding about adding pool swim heart rate support for our Ambit3 users too. If you’ve been using the Ambit3 to record heart rate during swim workouts, you’ll be pleased to see those metrics now appear in the charts and interval tables.

Where can I see my HRM data?

For pool workouts, heart rate data appears in three places in your workout details view:

1. Workout summary totals

View your Average and Maximum heart rate during a workout at the top of the details page:

You’ll also see your %max indicated to gauge the intensity.

Aerobic Efficiency

Tracking your heart rate during a workout allows SportTracks to calculate your aerobic efficiency (Explained here), and pool swims are no different. You can view your aerobic efficiency by clicking the heart rate summary block to cycle to the metric.

You’re going to notice a big difference in these numbers versus your bike rides and runs; remember the AE number is only relevant in the context of a single sport type. To get a better understanding of your AE progression, you’ll want to create a saved analysis report that includes just swims, and chart that metric over time.

Or if you’re more of a numbers person, you can add this column to your Workouts table view, filter by swims, and sort by workout date to see how your AE has changed over time.

2. Pool swim charts

The second spot you can see your heart rate data is within the pool swim chart. You can now add the HR metric just like all the other pool metrics.

If you’re new to swim HR data tracking (and who isn’t unless you’ve been using some alien technology from the future), you may want to start by putting a more familiar metric in the first position such as pace, stroke rate, or stroke distance, and then add heart rate as a secondary overlay. Some things you can gain insight on is how your cardio fatigue progresses within a set or during the entire workout, how rests impact your HR recovery, and differences in stroke performance. As you perform each different type of swim training workout, you’ll want to spend time looking at these charts.

3. Swim interval table

The last place you’ll find your detailed heart rate performance data is in the workout intervals tab. We’ve added a new column which allows you to view average or maximum heart rate, with or without a bar chart.

Seeing heart rate data alongside your stroke and pace information like this can be truly powerful. Take a look at the above chart where this swimmer is maintaining pace, but sees their stroke rate creep up in the last few intervals. Notice how their heart rate also jumped two intervals prior? Depending on the swimmers training goals they may want to tweak their plan.

Viewing swim HR trends

It almost goes without saying, but since you’re now able to track your heart rate during swims, you can also view this data in aggregate in the Workouts table and Analysis charts. Because the nature of swim workouts is different than your typical run/bike workouts (unless you’re doing interval training), the average HR may not be as useful. But it can still provide some trend data, or performance in relation to other metrics (such as swim pace and total workout distance). For open water swims that don’t involve turns and periodic resting, this can be really useful.

Wrapup

If you’ve got an HRM-SWIM or HRM-TRI we know you’re going to love these new analysis features. If you’re looking to improve your swim performance and don’t yet have this HRM, you might look into getting one. Enjoy!

Shop for Garmin HRM-SWIM band

How To
http://cache.sporttracks.mobi/blog/images/2016/02/swim-hr-cover.jpg

Using SportTracks with EasyTrails

$
0
0

We're proud to announce yet another iPhone app integration: You can now export sessions from EasyTrails directly to SportTracks! We love providing a variety of ways to track activities, and EasyTrails delivers. If you're looking for an app to track runs, walks, and bike rides — in addition to mountain climbs, hikes, and skis — EasyTrails is the ticket. Even if you're just wandering around picking wildflowers and mushrooms, this app has you covered.

More about EasyTrails:

  • It allows you to record your movement and mark waypoints
  • It lets you search for nearby tracks recorded by like-minded people
  • It lets you download archives of points of interests
  • It provides you with a rich set of charts and statistics
  • It guides you along a route with voice instructions
  • It can even calculate routes towards a destination

Stuck in an area with no internet coverage? No problem, load offline maps and you will never be without one. Are you a professional and require working with different units or exotic coordinate systems? EasyTrails can handle it.

EasyTrails is designed to work with many other applications. Integration is a priority, and SportTracks is the latest in a growing list of partners the app interfaces with.

Another quality that EasyTrails shares with SportTracks is longevity. SportTracks has been around for 10 years, and EasyTrails is one of the oldest tracking apps that is still being actively maintained. They have been in the App Store since 2009.

How To
http://cache.sporttracks.mobi/blog/images/2016/02/using-sporttracks-easytrails-cover.png

How to Use Pace Zones

$
0
0

We recently wrote about the basics of zone-based training, which introduces the concept of training with zones to complete beginners — so they can fully understand it. That post covers the fundamentals and shows you how to determine your current training zones so you could start using them right away. In this post, we dig deeper into pace zones, and explain how you can apply them to your training in a meaningful way.

You can find lots of information about heart rate and power zone training with a quick search on the web, but, if you’re curious about pace zones, information is more scarce. You can find out how to determine your pace zones, but it’s not clear what you’re supposed to do with them.

Why train with pace zones?

Pace zone training is very similar to heart rate training. Once you know your current threshold and zones, you can train to improve them, and target specific paces for intervals and other drills. If you don’t have access to a heart rate monitor, you can utilize pace zone training in its place. If you have one, you can mix up your training and keep things fresh by switching between heart rate and pace zone training, and combinations of the two.

To get started with pace zone training, you first need to determine your current zones (which is explained later in this article). Once you have that information, you can target your workouts to try to improve your efficiency at specific speeds, so you get faster. After four to six weeks of training at targeted paces, you can test your zones again, and see if you improved. At that point you can start training at your new threshold to see if you can improve yet again.

How do you determine your pace zones?

You determine your pace zones by running non-stop for 30 minutes on a flat course, going as fast as you can without slowing down. Your average pace from the entire 30 minutes will be your threshold pace. In order to determine your pace zones, you need to do some math, which is explained in this post (scroll down to the Running zones based on pace section). If you have a heart rate monitor, you should wear it during this test, as you will also be able to determine your LTHR from the final 20 minutes.

When I last conducted this test, my threshold pace was 5:55/km. Once I calculated my current pace zones, I went into my SportTracks account and updated the settings in my Training Options to match my new pace zones. Now when I do any running workout, I can look at the Analysis section of the workout details, select Pace, and see how much effort I applied in each zone. This is also useful for workouts where you're trying to target specific pace zones. You'll be able to see how effectively you hit your targeted zone. Nailing specific paces when you're out there pounding the ground is trickier than it sounds!

Pace zone training methods

How you decide to train with pace has a lot to do with your current physical state and your goals. You will have different needs if you're returning to running after an extended break, as opposed to someone who is more fit. Likewise, your needs will be different if you're training for a 5K, 10K, half-marathon, marathon, or multi-sport events.

That said, it's worthwhile to add pace zone training to your routine. Ultimately, everyone has a threshold, and doesn't hurt to train to improve it. The exact science behind threshold training is a bit fuzzy, but it's ultimately beneficial to add variety to your workouts, and pace zone training certainly accomplishes this.

Borrowing from the Jack Daniels’ school of thought, one of your tasks is to simply train at your threshold pace to see if you can improve it.

Training at threshold pace 

Borrowing from the Jack Daniels’ school of thought, one of your tasks is to simply train at your threshold pace to see if you can improve it. Run right at, above, or just below your threshold pace for an extended period of time in an effort to increase it.

Some GPS watches have features that help you lock into specific pace zones. They alert you if you start running too slowly or too quickly, so you can maintain a specific pace for extended periods of time. If your watch or tracking device lacks specific pace zone features, it’s a simple matter of monitoring your pace as you run, so you stay in your targeted pace for as long as possible. The “real-time” pace feature on your device (which is often just called Pace) is the preferred metric you want to look at, as opposed to Average Pace or Lap Pace. 

Your threshold pace is theoretically what you can sustain for one full hour in a race. The test to determine your threshold pace may only be 30 minutes long, but when you’re in the energetic atmosphere of a race, you typically can go longer and harder for greater lengths of time. Obviously, if you successfully train to increase your threshold pace, you will fare better in endurance races.

Interval training at threshold pace

Your threshold pace is at a high-exertion level (in my case it's in Zone 4). Training at high intensity levels for extended periods of time on a regular basis is taxing to your system, and the benefits of doing so are questionable. In order to effectively train in this zone, it's advisable to experiment with threshold pace interval workouts.

After a short warm-up run, start a series of five minute intervals at your threshold pace with one minute cool-down segments in between. Don't forget to hit the Lap button for each interval (both the cool-downs and the threshold pace segments). Completing five sets of these intervals is similar to an LTHR test, just with helpful one-minute breaks every five minutes. :) You can mix things up with intervals in the zones just below or above your threshold pace. As you get more fit, try extending the duration of the high-intensity segments, and shorten the length of the cool-downs.

I found it helpful to configure a specific data screen on my Garmin Forerunner watch for threshold pace interval workouts. I put the Timer in the top field, so I could keep track of my intervals, and also know the full duration of my run. In the middle field I put Pace, and in the bottom field I put Heart Rate, because I wear a chest strap HRM when I run. The next time I do one of these workouts, I may swap out Lap Pace for Pace in the middle field. The Pace metric was lagging a bit too far behind real-time. Seeing the average pace for the current lap would be more helpful.

Wrapping up

These are just a few ways that you can utilize your pace threshold and pace zones. If you work with a coach, they will likely schedule different drills in your training plan, depending on your ability level and the events you're training for. If you want more information about threshold pace training, check out the chapter on Training Runs and Intensities in the Daniels' Running Formula book.

Training
http://cache.sporttracks.mobi/blog/images/2016/02/how-to-use-pace-zones-cover-jogger.jpg

Contest Winners Announced!

$
0
0

We just finished choosing the winning photograph for the #SportTracksScenes contest. This task proved to be exceedingly difficult! We were delighted by the large number of engaging images that were submitted, but, there can only be one winner.

However... what if there were six?

Yup. There were so many great photos that we felt compelled to increase the number of winners to six! And every one of these winners gets a free one year subscription to SportTracks. Better than a gold medal! In fact, nipping at the heels of the top six were a formidable number of photos that were ALMOST good enough to be at the front of the pack. In true SportTracks fashion, watching this contest unfold was much like watching a hotly contested race.

And with that, we present you with the winners...

FIRST PLACE

The first to cross the finish line to claim the #1 spot was a SportTracks user named Rebecca! A true endurance event, the #SportTracksScenes contest lasted a grueling 34 days. As you know, you can't just roll out of bed one morning and decide you're going to compete in an event like this. It takes lots of practice and preparation to capture a photograph of this caliber. Great job!

SECOND PLACE

Coming in second, just moments behind our leader, was SportTracks user Eliran! Powering through relentless desert heat with a smile on his face and a spring in his step, Eliran's strategic use of color in his attire gave him an edge, and the double sports watches on his wrists sealed the deal. Excellent work!

THIRD PLACE

The dramatic third place finish belongs to SportTracks user Sigmar! In a battle for first, Sigmar momentarily passed Rebecca, but lost control shortly afterward and launched over a cliff. A huge smile crossed his face as he soared through the air! Landing unscathed, he produced some rope from his pack, climbed back up to the course, and continued to nab third. Amazing!

FOURTH PLACE

The fourth place finisher in the #SportTracksScenes contest belongs to Stuart Quadrathon! It's well known that waterproof cameras are excellent tools for capturing and reviewing your swimming form  but they're also great for competing in sports photography contests. Nice technique!

FIFTH PLACE

Coming in fifth is SportTracks Coach Mika! There's a lot to like in this photograph: The mixture of subtle motion blur and tack-sharp focus; the generous use of black and white paired with splashes of bright colors; and the bike... it just looks awesome. Great stuff!

SIXTH PLACE

The sixth and final winner of the #SportTracksScenes contest is Lourdes! As I mentioned earlier, there were many photos that were almost chosen to be in the top six, and several of those were submitted by Lourdes herself. Great shot!

We would like to thank everyone for participating in this contest. It was awesome to get a glimpse of your sporting lives. We love the idea of SportTracks users connecting with one another, so we encourage you to continue using the #SportTracksScenes hashtag to find each another across the various social networks so you can connect and share your experiences. Thanks!


Community
http://cache.sporttracks.mobi/blog/images/2016/02/contest-winners-announced-cover.jpg

Tips on Buying a Bike

$
0
0

Picking the exact bike for your needs is complicated — whether the goal is to train for a triathlon, a road race, or to simply to get fit while enjoying fresh air and scenery. There are many factors to take into consideration: budget, fit, type of riding, quality of components, weight, etc. This article will supply you with many tips to help you in your hunt. 

New or used?

Good bikes aren’t cheap. Cycling can be an extremely expensive sport, if you let it. After glancing at the prices of new road bikes, you might be tempted to immediately look in the used market to see if you can find a deal. While it’s true that you can save money upfront with a used bike, there are a number of things you need to take into consideration.

First of all, if you’re not an expert, you won’t know what to look for. Can you determine if a bike is in need of repair after having a short test ride? Do you know how to spot a problematic crack, bend, or misalignment? Can you identify the components on a bike and accurately determine their age and the price range they should be in? If you have an experienced friend who can help guide you through the process, you should definitely seek their advice.

One of the biggest concerns you should have about your bike is fit. Do the measurements of the bike properly match your body size (height, inseam, and arm length)? If you’re buying a used bike, you need to be aware of its size, and you need to find one that will fit you. If you find a used bike that fits, you should still budget extra money for a professional bike fitting after the purchase. Little details like the height of your seatpost and the length of your stem make a world of difference. It’s also strongly advisable to budget additional cash for a complete tuneup at a local bike shop.

One of the advantages of using a qualified local bike shop to purchase a new bike is that the fitting and your first tuneup are often included. Plus, you will know that the brakes, tires, drivetrain and cabling are all fresh and in top working order. The shop may also be able to put you in touch with other local cyclists for group rides and other community events.

The almighty budget

Budgeting for a bike purchase can be complex and difficult. When you get to know the various options that are available in your price range, it’s easy to upsell yourself on higher-end groupsets, frames, wheelsets, and more.

Here's a road groupset cheat sheet. The least expensive (yet still formidable) bikes will typically
have the entry-level groupsets (or elements of them mixed with other parts):

ShimanoSRAM
Entry-level: ClarisEntry-level: Apex
Next up: SoraNext up: Rival
Next up: TiagraNext up: Force
Next up: 105Best: Red
Next up: Ultegra 
Best: Dura-Ace 

The problem is that you shouldn’t spend everything you have on the bike alone. You’re also going to need pedals, a helmet, water bottles, lights, a saddle bag, a tire repair kit, tubes, a multitool, a pump, and more. It’s also a good idea to get at least one jersey and a pair of lycra bike shorts or a bib. You don’t just want to look the part, you want to be aerodynamic and as comfortable as possible when you ride.

As bike frames and the components they come with increase in quality, they typically get lighter in weight as the price goes up. It’s a good idea to add up the cost of all of the accessories you’re going to need, and then look at the available bike options with the remainder of your budget.

Cycling tech: now or later?

If you’re interested in sports technology, the most desirable piece of equipment for a bike is undoubtedly a power meter. Professional and enthusiast cyclists alike emphatically swear by power meters as the single most important tool for both training and racing. However, this creates a quandary for new cyclists: should you invest in a power meter now, or should you wait and possibly get one later?

Power meters are expensive, and finding one that’s compatible with your bike can be complicated. The good news is that the price of power meters has dropped significantly in the past few years. The bad news is that entry-level prices are still a bit steep, and a bike computer is also required to read and display the information from the power meter. Ouch.

Presently, you need to spend around $600 USD to outfit a bike with a basic power meter and bike computer. Obviously, for someone new to the sport, this is a sizable investment. However, it’s still something to strongly consider, especially if you’re training for an endurance race or a triathlon.

The longer you train with power, the better you will understand your capabilities and how you can improve on them. So, in this sense, it would be advantageous to train with a power meter from the very beginning. Getting one right away is the furthest thing from mandatory, but again, it’s something to strongly consider, if at all possible.

Learn more about training with a power meter in the SportTracks blog.

Ride before you decide

You may get enamored with a specific bike, based on your research and personal taste. While it’s perfectly fine to gravitate towards a certain model, it’s important to dedicate some time to test riding several bikes before you make a final decision. This is true even when buying a used bike. However appealing it may be on paper doesn’t mean that it will feel right when you actually get on and start pedaling.

If possible, visit several local bike shops to see what they have to offer in your price range. Be sure to wear clothing suitable for riding when you visit the shops. Ask about warranties, tuneups, and fittings while you’re there. This practice is incredibly useful to experience how the different bikes feel — and also to see how you like working with the various bike shops in your area. 

Love your bike

Cycling is extremely technical. It takes a while to learn all of its jargon and vocabulary. Don’t let the complexity totally dissuade you from your gut instincts about a particular bike. At the end of the day, it greatly benefits you to have a connection with it. You should love the way it looks. It’s important that the bike speaks to you. You’ll be more likely to stick with it, and to get out there riding as often as you can. Besides, you just spent $600 on a power meter. You don't want to quit riding a week later. ;)   

Training
http://cache.sporttracks.mobi/blog/images/2016/03/tips-buying-bike-cover-image.jpg

Health Page Customization

$
0
0

A few weeks ago we announced a major redesign of the Analysis page featuring customizable page layouts. Today we’re happy to announce this same customization is now available on the Health page!

You can now click the Customize button to change the layout on your Health page:

Pick the number of rows and columns you want to view in the customize dialog. Your layout is stored per device, so you can have a different layout on your laptop versus your smartphone.

To select what data to display in a panel, click the Settings button in the upper right corner:

New Metrics for Heart Health

The changes this week also include two new metrics you can track on the Health page:

  • Resting Heartrate
  • Heartrate Variation

Once you’ve selected the data to view, simply click in the chart to manually add your RHR or HRV values. We’re also working with a few of the most popular HRV apps to add data auto-sync to the SportTracks platform. Got a favorite HRV app you use? Let us know in the comments.

Tracking these two metrics can be a great way to indicate fatigue, overtraining, or sickness. It’s a fantastic addition to SportTracks that helps you get a better picture of your potential fitness performance, and tell you if you need to adjust your training plan.

We hope you enjoy these new customization options! It's just one more way you can easily personalize SportTracks to suit your specific needs.

How To
http://cache.sporttracks.mobi/blog/images/2016/03/health-page-customization-cover-image.png

#SportTracksScenes is Back!

$
0
0

We recently announced the winners of the original #SportTracksScenes contest, and we surprised everyone by giving a free year of SportTracks not just to one participant — but to six! Their photos were just too good to pass up. Now we're excited to announce that this contest has been extend through the rest of 2016!

Starting in March and finishing up at the end of December 2016, we will be awarding one FREE year of SportTracks to a participant each month. The way you enter the contest remains the same: share a photo on Facebook, Instagram, or Twitter with the hashtag #SportTracksScenes. A winner will be chosen at the end of each month, and their photo will be included on the SportTracks login page.

Why are we keeping it going? First and foremost... it was really fun! We love seeing little glimpses of our users' worlds! Plus, we like the idea of having a large number of people featured on the SportTracks login page. Lastly, we want to encourage you to keep using the #SportTracksScenes hashtag. It isn’t just a way to potentially win a free year — it’s a way to connect and engage with other like-minded SportTracks users. 

You can brush up on the official rules at the #SportTracksScenes contest page. Also, you are encouraged to enter this contest as many times as you wish! Throughout 2016, when you get those endorphins pumping — get those creative juices flowing too! Good luck!

Community
http://cache.sporttracks.mobi/blog/images/2016/03/sporttracksscenes-back-logo-cover-image.png

Tracking HRV with Garmin Watches

$
0
0

We recently announced the ability to manually input Heart Rate Variability (HRV) and Resting Heart Rate (RHR) data into the newly-customizable SportTracks Health page. In addition, HRV data can automatically be included in the .FIT files from specific Garmin sports watches! 

If you have access to a Garmin 920XT, 910XT, fēnix 3, or a Forerunner 620, you can start tracking and analyzing your HRV data in SportTracks — but first you need to manually enable the recording of this data on your watch. Instructions are below...

Garmin 920XT, fēnix 3, and Forerunner 620

To enable HRV recording you need to do the following:

  1. Connect your watch to a computer with the supplied USB cable
  2. Download this file
  3. Put that file (which is named “enable_hrv_settings_file.fit”) into your watch in this folder: :\GARMIN\NEWFILES
  4. Sync your watch with Garmin Express and disconnect

Garmin 910XT

To enable HRV recording you need to do the following:

  1. Power up your 910XT
  2. Press the Menu button
  3. On the Menu screen, press the Up button then the Down button, and repeat this ten times. 
  4. After pressing Up and Down a bunch of times, the watch will display its Diagnostic Menu. In the top right, select HRV to enable it.

Turning on this feature will eat a little more battery life than usual and make your FIT files noticeably larger, but it’s worth it to reap the benefits of HRV training.

NOTE: An article that clearly explains the benefits of training with HRV is coming soon. Stay tuned!

HRV App for Garmin Connect IQ

If you have access to a Garmin watch that features Connect IQ, you can download and run the free HRV app, which provides a simple way to test your HRV. The current Garmin products that are compatible with Connect IQ are the 920XT, 920XTJ, epix, fēnix 3, fēnix 3 HR, the vívoactive, and the D2 Bravo.

Is there another way to measure HRV?

If you don't have one of those Garmin watches, you can track your HRV with specialized mobile apps. If you use an iPhone or iPad, we recommend the excellent HRV4Training app. SportTracks is currently working with HRV app developers to integrate with our platform. Exciting new functionality is on the way!   

The instructions for the 910XT were provided by the5krunner.com.

Training
http://cache.sporttracks.mobi/blog/images/2016/03/tracking-hrv-garmin-watches-heart-graphic.jpg

Track HRV with an iPhone or iPad

$
0
0

What’s the first thing you do when you wake up in the morning? Some people spend a few minutes measuring their HRV with the HRV4Training app (I explain why later in this post). If you're one of these people, we have great news: You can now auto-sync your HRV4Training data and analyze it on the SportTracks Health page!

If you’re not familiar with using HRV data to enhance your training, here’s a quick explanation: It’s the practice of using a specific kind of heart rate data to determine how well your body has recovered from your last workout. This information can be used to predict what level of intensity your next workout should be to achieve optimal results. This is why bleary-eyed athletes fire up the HRV4training app before they even set foot out of bed.

There are a number of different apps you can use to measure your HRV, but if you use an Apple device, HRV4Training is among the best. It has the unique (and extremely convenient) ability to utilize the device's built-in camera and flash to measure your heart beats. This is really useful, because the best time to test your HRV is when you first wake up in the morning, and other apps require you to put on a Bluetooth-enabled chest strap heart monitor.

Syncing the HRV4Training app with SportTracks is easy:

  1. Get the latest version of the app installed on your device (6.2.6 or later)
  2. Open the app and tap the hamburger menu in the top left corner
  3. Scroll down to Settings and tap on it
  4. Scroll down to the "Sync with cloud servers" section and tap on "Link to SportTracks"
  5. On the next screen log into SportTracks
  6. Tap the "Yes, I authorize this request" button and you're done 

We recently announced the ability to track HRV and RHR (Resting Heart Rate) data on the SportTracks Health page. This can be done by manually entering the information, or enabling hidden HRV functions on specific Garmin watches, such as the Garmin 920XT (complete information is available in this post).

In order to view and analyze your HRV4Training data on the SportTracks Health page, you need to do a little customization:

  1. Click on the gear icon in the top right corner of your Health page
  2. In the Customize window, click + then > to add modules for your HRV and RHR data, then click Close
  3. Scroll to the new modules you just created, and click one of their gear icons
  4. In the next window, select "Heartrate variability (HRV)" as the value
  5. Repeat this process and select "Resting heartrate" for the other module

The HRV4Training integration is exciting because new data is automatically synced to SportTracks after every measurement you take with the app. In addition, your past 60 days of readings will be imported into SportTracks after you sync. Older measurements can be imported into SportTracks as well by visiting the History page in HRV4Training and tapping on the bars.

If you want to train with an HRV app on Android that has an auto-sync integration with SportTracks, rest assured that we are working on it, and a solution will be available soon. Keep an eye on the SportTracks blog for an announcement about this in the near future! Also, if you want to learn more about the principles of training with HRV, we are currently putting together a post that will clearly explain everything you need to know. This will be published soon. Stay tuned!

How To
http://cache.sporttracks.mobi/blog/images/2016/03/connect-hrv4training-app-cover-image.jpg

Connect with Ride Journal

$
0
0

There are plenty of apps that can transform iPhones and Android devices into powerful bike computers, but what about Windows Phone? If you want to turn one of Microsoft’s handsets into the brain of your bike, an app called Ride Journal is an excellent option — and you can now auto-sync these workouts directly to SportTracks!

Whether you’re out in the fresh air or indoors on a trainer, Ride Journal acts as your central tracking and monitoring device. It records your GPS data when you’re on the roads and trails (you can also opt to not record your location), and it pairs with Bluetooth sensors to show live stats on the phone’s display, which is useful for both indoor and outdoor training.

When you’re finished, the resulting GPX or FIT file will automatically be uploaded to SportTracks for analysis — and for the critical purpose of gauging how these workouts impact your overall fitness and Training Load. How much data you record with Ride Journal is dependent on how many sensors were connected during your workouts (it syncs with Bluetooth heart rate monitors, power meters, and speed/cadence sensors).

We’re excited about the Ride Journal integration, because it creates an excellent ride-tracking solution for SportTracks customers who use Windows Phones. If there are other fitness apps on the Windows 10 Mobile platform that you want to integrate with SportTracks, please let us know in the comments. We would love to hear about it!

While we’re on the topic, it’s worth mentioning that SportTracks runs perfectly on the Microsoft Edge web browser that comes installed on Windows 10 Phones. When we say you can access SportTracks from any web-connected computer or device, we mean it.

How To
http://cache.sporttracks.mobi/blog/images/2016/04/connect-ride-journal-cover-phone-bikes.jpg

How to Train with HRV

$
0
0

Training with a GPS watch or a bike computer can be extremely beneficial, however, there is another kind of tracking that’s worth your time and attention: It’s called HRV, and it helps you determine the workout intensity that best suits your current physiological condition. Ready to meet your new daily ritual?

What is HRV?

HRV stands for Heart Rate Variability. It’s the practice of measuring the amount of time between heart beats, and using that data to determine your current physical state. If a heart beats 60 times a minute, it doesn’t fire mechanically every second. There are slight variations in time between each beat — often just a few milliseconds. It turns out that measuring these short time differences can tell you a lot about your current level of recovery from your last workout.

You don’t need to tell your heart to beat, or to command your lungs to breathe; it all happens unconsciously.

When you do a hard workout or experience a lot of stress, the variability of your heart beats decreases. However, the more variability you have, the better. Monitoring your HRV daily with a dedicated app you will make you aware of acute changes, and suggest the level of intensity your next workout should be, or recommend taking a rest day. This information is closely related to Training Load, which is why SportTracks enables you to track HRV data on its fully-customizable Health page.

What’s the science behind HRV?

Measuring the amount of time between your heart beats is a way to gauge the state of your autonomic nervous system. Many of the functions of your body work automatically. You don’t need to tell your heart to beat, or to command your lungs to breathe; it all happens unconsciously. This is the role of autonomic system, which is split into two divisions: sympathetic and parasympathetic.

In regards to tracking your HRV for the purpose of optimizing sports training, the branch we’re interested in is the parasympathetic, as it’s related to rest and recovery. Workouts are stressors that impact your HRV. By measuring your HRV when you’re in a rested state, you can more accurately gauge the amount your body has recovered.

How can I measure my HRV?

The most convenient way to measure your HRV is with a smartphone or tablet running a dedicated mobile app. The best time to do it is when you first wake up, before you even get up from bed. Mobile devices are a good fit for this purpose, as you can easily grab them from a bedside table and take your measurement.

Some HRV apps require you to wear a Bluetooth-enabled heart rate monitor in order to take the measurement. An app called HRV4Training has the ability to utilize the built-in camera on an iPhone or an iPad to take the measurement, so no strap is required. However, this app is only for Apple devices. If you use an Android device, using the ithlete app and a heart rate strap is a solid option.

What is my HRV data going to tell me?

Training with HRV doesn’t provide immediate gratification. In order to determine the first actionable information from your data, you need to have taken HRV measurements for several days in a row to create a baseline of data.

Insights from HRV are culled from both acute and chronic changes, so your first few days of measuring are only the beginning. Some HRV analysis features require months of consistent measurements to become useful. Think of this as a long-term exercise. The more days you commit to taking readings and accumulating data, the more informative and useful the practice will be.

HRV data can offer a lot of insight, unlike the “Stress Score” feature found on some Garmin watches, which only supplies you with a number between 1 and 100. The variation of your heart beats can be quantified a number of different ways, which is why more than one useful analysis tool can be derived from this data. Good HRV apps provide a suite of tools to guide your training, not just a single score.

Are HRV measurements accurate?

It’s only been a short time since HRV left the confines of the laboratory and made its way into your pocket. Electrocardiogram machines with wires and sticky electrodes used to be required to accurately measure HRV, but now it can be done with inexpensive, commercially available equipment.

However, just because the practice of measuring HRV has become user-friendly and portable doesn’t mean that precision is no longer required. In order to gather accurate HRV data, you need to be disciplined and consistent. The stresses of everyday life can inaccurately impact your HRV readings. This is why taking your measurement immediately after you wake up is the best option. Pacing your breathing as you take the measurement is also very beneficial. Most HRV apps feature on-screen guides to help you optimize your breathing.  

If you need to pee when you first wake up, it’s okay to get up and do so. However, even this simple activity impacts your heart rate. If you get up, you must lie back down in bed and relax for a few minutes afterward. Relaxation is key. Ignore your mobile device during this time. No checking emails, or browsing Facebook, etc. Relax for a few minutes and clear your head. Then take your HRV measurement.

Can measurements only be taken in bed?

If you prefer to stand or sit, it’s still possible to accurately measure your HRV. However, you cannot rush your way through it. The mere act of standing up, or walking over to a chair and sitting can skew your results. Once you’ve stood up or sat down, you are going to need to relax for a couple of minutes before you take your reading. Be patient and still, and once again, only use your mobile device to measure your HRV (stay off of Twitter and Instagram).

Why would I analyze HRV data in SportTracks?

Daily HRV measurements provide you with insight about your current level of recovery, but when you accumulate data, you can begin to spot trends in your fitness, and gain a better understanding your overall physical condition. It’s important to look at long-term trends in both HRV and RHR (Resting Heart Rate). HRV is related to recovery and readiness to perform, while RHR is more closely linked to fitness and VO2max.

It’s especially important to look at these physiological variables in the context of your training plan. You can display your HRV and RHR charts on the SportTracks Health page and easily filter the date range to look at a week, month, 3 months, entire year, or your complete workout history. Zooming out will reveal trends on how your HRV and RHR interacted with your training and race schedule. 

It’s worth mentioning that the outcome of training with HRV isn’t always predictable. Sometimes a decreasing HRV trend when you’re tapering for a competition can be a good thing. However, this is not a rule. It simply shows that it’s not as easy as "higher is better." Looking at multiple parameters is what you need to do when looking at trends over longer periods of time.

Will tracking HRV lead to data overload?

The question of how much data is too much data is up to the individual. Some people can’t get enough, others get overwhelmed at a certain point. The nice thing about tracking your HRV is that it simply offers advice based on your current state on how intensely you should workout. If you want to dig deeper into other analysis tools, they are there if you want them.

Similar to the Training Load and Performance charts in SportTracks, HRV tracking is an additional way to avoid overtraining, so you can stay healthy and put in your best performance. It’s as simple as that.

Marco Altini, creator of the HRV4Training app, contributed to this article. 

Training
http://cache.sporttracks.mobi/blog/images/2016/03/how-train-hrv-cover-image-smartphones.png

How to Fix Garmin Auto-Sync

$
0
0

Auto-sync is the fastest way to get your workout data into SportTracks if you use a Garmin device. But, as you may know, technology can be a little finicky. Little problems can arise that break the connection between Garmin and SportTracks. This article explains how to make these problems go away.

1) Check your workflow

If you’re having trouble, make sure you’re following the proper sync procedure. You may be missing a step!

You need to link SportTracks to your Garmin Connect account in order for auto-sync to work (set up explained in this post). After you finish a workout, you need to get the file off of your device and onto the Garmin Connect website. The easiest way to accomplish this is with a smartphone or a tablet.

This is how to do it:

  1. Turn on Bluetooth on your mobile device.
  2. Wait for your Garmin to pair with your mobile device (your Garmin will notify you when it’s paired).
  3. Launch the Garmin Connect app on your mobile device.

At this point, the mobile app will pull the workout file from your Garmin device and upload it to the Garmin Connect website (this may take a minute or two). The moment your workout is uploaded to the Garmin Connect website, auto-sync will send it to SportTracks.

You need to follow these steps every time you sync files from your Garmin to SportTracks (which, let’s face it, should be every activity :). If you correctly follow this procedure and auto-sync fails to work, it’s best to remove the connection between your accounts, and then re-link them.

2) Clean your slate

This is how you remove the link to Garmin Connect in SportTracks:

  1. In your SportTracks account, select “My account” from the drop-down menu in the top right of the screen.
  2. Select the “Sharing” button from the vertical menu on the left side of the next screen.
  3. Lastly, click the “Remove” button beside Garmin Connect.

Now that SportTracks is un-linked, you should remove the link in your Garmin Connect account as well. To do so, you need to visit the “Applications” section of the Garmin Connect website, and click “Remove Permission” for SportTracks. This is where you can locate the Applications section in Garmin Connect:

  1. Visit the Garmin Connect website and log in
  2. Click the hamburger menu in the top left of the screen
  3. Click the profile icon in the vertical navigation bar in the top left of the screen
  4. Click Settings
  5. Click Account Information
  6. Scroll to the bottom of that screen, you should see the Applications section there 

If you see more than one link to SportTracks in your Garmin Connect account, be sure to click “Remove Permission” for each one of them, until they’re all gone.

3) Reunite your accounts

After you remove the SportTracks connection from your Garmin Connect account, you can go back into the Sharing section of SportTracks and reestablish the connection with Garmin Connect.

Once you’ve done this, do a test workout with your Garmin device (a short walk around the block is sufficient). Follow the instructions in the "Check your workflow" section above to get this test workout off of your Garmin and into the Garmin Connect website. Lastly, look for this workout in your SportTracks Dashboard to see if auto-sync is working properly.

If you have any questions at all, please post them in the Comments below. Thanks!

How To
http://cache.sporttracks.mobi/blog/images/2016/05/how-fix-garmin-cover-image-phone.jpg

Swim Tracking with Garmin

$
0
0

If you’ve ever been near the starting line of a running race and experienced the hive-like buzzing and beeping of sports watches, you understand how widely embraced technology is in running. The use of tech in endurance cycling is also extremely popular; many cyclists consider their power meters to be the most important part of their bikes. But, does the same hold true for swimming?

Like any sport, advanced tech isn’t for everyone. Some swimmers prefer the task of counting laps in their heads and using poolside pace clocks or basic waterproof watches to measure their workouts. For gliding purists, the slight drag created by watches or heart rate straps is a nonstarter. But, the benefits that technology provides swimmers more than makes up for its quirks for a great number of people.

What quirks, you ask? Swim tracking poses challenges that aren’t as prevalent in other sports. For example, an indoor pool can be a difficult (or impossible) place to establish a reliable link to a GPS satellite, which can generate inaccurate mapping data. Swim watches also have a tendency to inaccurately register wall turns and laps — especially when you’re first getting familiar with the quirks of a specific device.

It's far from perfect, but, do the downsides of swimming tech make it a bad idea? This answer is largely based on personal opinion, but here at SportTracks, we think it’s extremely beneficial in its current incarnation, and will only improve with time. Sure, as makers of some of the best swim analysis software on the planet, we’re a little biased. :) But, here’s a fact that warrants deep consideration: Advanced swimming tech helps many athletes dramatically improve their times.

...here’s a fact that warrants deep consideration: Advanced swimming tech helps many athletes dramatically improve their times.

How? For starters, since you don't have to count laps, you can instead focus the majority of your attention on optimizing form. This simple benefit alone offers potentially huge rewards. Plus, tracking and logging every swim workout enables you to see the bigger picture of your overall fitness, which is crucial for race preparation. I'll cover more of the benefits of swim tracking later in this article, but first, let's take a look at the swim gear itself.

Which swim tracker "suits" you?

The latest swim-capable GPS watch was just announced yesterday. The new Garmin FR735XT is designed for triathletes, but it can be used by anyone who wants a swim watch with the latest tech. The FR735XT has a built-in heart rate monitor, but unfortunately, you need to wear either the Garmin HRM-TRI or HRM-SWIM chest strap to monitor and record your heart rate in the water. 

Another popular option that's also nicely outfitted for triathletes is the Garmin 920XT. While it's slightly more bulky and doesn't have as many new features, its battery lasts a bit longer than the FR735XT. This has been the go-to watch for many serious athletes over the past two years, even though a chest-worn heart rate monitor is required for HR data. 

A watch called the Garmin Swim has a much more attractive price, and it doesn't utilize GPS. This makes it a good option for training in indoor pools. The Garmin Fenix 3 and Fenix 3 HR have a robust design and some interesting features (such as a fishing mode). The older Garmin 910XT still delivers some great swimming features, and if you're not into Garmin, the Suunto Ambit 3 is a solid option. 

The real benefits of swim tracking 

Detailed swim data isn't a bunch of meaningless numbers and charts. It's useful information about your personal performances that reveal formerly unseen strengths and weaknesses. Analysis software makes you aware of stroke count, rest times, pace, and training zones (providing your watch records this information). Here are some ways this data is used:

  • Some swimmers see their stroke efficiency improve when they execute specific sequences of "mixed stroke" drills (which usually involves alternating between backstroke and freestyle). Their swim data enables them to determine the most effective stroke sequences that deliver the best overall efficiency.
  • Many swimmers see their stroke efficiency decrease during long swims. Instead of achieving the negative split they had trained for with ladder sets, they end up working harder without going faster. Analyzing your swim data makes you aware of this common downfall so you can train to improve it.
  • Is the duration of your rest intervals maximizing your efficiency? You may find that taking 30 second rests (as opposed to 20 seconds) improves your overall efficiency. However, without data analysis, you're largely in the dark.   

Reviewing your swim workouts in SportTracks equips you with stroke performance charts, and offers full analysis of sets, intervals, distance and SWOLF. Plus, our software leads the industry in accurate heart rate data from chest-worn heart rate straps. To be blunt, if you invest in a Garmin FR735XT and a HRM-SWIM  or HRM-TRI chest strap, you simply will not see actionable heart rate swim data unless you use SportTracks. Period.

The bottom line is that tracking and logging swim workouts can benefit any athlete who is training for a specific competitive event. Even swimmers who don’t care for the minutia of data will gain a distinct strategic advantage by utilizing training load and performance charts for accurate tapering. If you disagree, go jump in a lake. ;)

Photo credit: barshy (Flickr) Creative Commons Attribution 2.0 license

Training
http://cache.sporttracks.mobi/blog/images/2016/05/swim-tech-cover-image.jpg

Connecting with TomTom

$
0
0

If you workout with a TomTom GPS watch, we have some great news: Today we're announcing direct auto-sync with TomTom MySports!

When you enable auto-sync, you no longer need to manually upload workouts. Just like our auto-sync functionality with Garmin, Suunto, Epson, Withings, and TrainerRoad, workout files are automatically uploaded to SportTracks. It's super easy.

Configuration

1. Click on your profile in the upper right corner of the app, click the My Account button, and then select the Sharing tab on the left.

2. Click the Connect button.

3. Select the TomTom MySports option.

4. You will be taken to the MySports website to authorize SportTracks to access your account. Click the Authorize button (you may need to enter in your login credentials).

After you authorize, SportTracks will import your workout history from MySports, as well as any new workouts you complete going forward. If you have workouts in MySports that you already manually uploaded into SportTracks, they will not be duplicated when you sync accounts. SportTracks is smart enough to recognize and dismiss duplicate workouts.

We love adding new sync partners to SportTracks! We're interested in anything we can do to make fitness tracking easier, so you can concentrate more on training and sports, and less on fiddling around with tech. Enjoy!

How To
http://cache.sporttracks.mobi/blog/images/2016/06/connecting-tomtom-cover-image.png

Find your community

$
0
0

Working out alone is often therapeutic and thought-clensing, however, everything isn't better in isolation. Communicating with friends and regularly seeing familiar faces is what makes us human. That's why easy-to-use connection tools are built into SportTracks.

This blog post is giving you an assignment: You need to connect with some fellow SportTracks users  whether they're in town or on the opposite side of the planet.

Why should you connect?

  • Encouragement and community make endurance training more fun
  • If you're having more fun, you'll enjoy what you're doing a lot more
  • If you enjoy what you're doing more, you'll improve faster!

The following instructions only take a couple of minutes to complete  yet they dramatically improve all of your training efforts. ;)

1) Get on the map

First, set your location in SportTracks. Click your profile in the upper right corner, click the My account button, and then click the Location button:

Next, enter your location, select the correct option, and hit Save:

PRO TIP: You can move the pin on the map to the exact spot you want.


2) Find some amigos

Click your profile in the upper right corner again, but this time select My connections. In the card that appears, click the circular + button:


This brings you to the Find Connections page where you'll immediately see people who are geographically closest to you:


A search field is at the top. This is where you enter names or email addresses. Below that you'll see cards of the SportTracks users who live nearby. Want to do a group run, ride, or swim? These people likely already work out on your favorite local routes. Why not connect and train together? It's a proven way to get faster!

Check out the screenshot above one more time. To the right of the search field there's a small whistle icon. This is our new Coach Search tool. Click it and you are brought to a similar screen, except all of the people in the results are professional coaches that you're encouraged to contact and hire.

Okay... back to your assignment. Select someone from your Find Connections page, and push the Connect button. You're done.

When the other person accepts your request, SportTracks will notify you with a red bell icon in the corner of the app. The next time you search for friends, you'll see a green check mark in the right corner of the cards of people you're already connected to.

One of the best parts about working at SportTracks is interacting with our community. You are an exceptionally pleasant and intelligent group of people. We're absolutely confident you'll enjoy engaging with them as much as we do!

Lastly, don't skip your assignment! You already love SportTracks. Connecting with other users makes it a lot more fun. Don't miss out! Consider the wisdom in this ancient, British proverb: Shyness is nice, and shyness can stop you from doing all the things in life you'd like to.

How To
http://cache.sporttracks.mobi/blog/images/2016/06/find-your-cover-image-runner-legs.jpg

Introducing Coach Search

$
0
0

We recently introduced several location-based features that enable SportTracks users to easily find and connect with one another — with the goal of not just making friends, but also of finding new members for group runs, rides, and swims. While we were at it, we snuck in a powerful new tool that helps athletes easily find SportTracks coaches. Ingeniously, we call it Coach Search.

After you save your location in your SportTracks My Account page, you can easily search for coaches that are nearby (and far away, too). This tool is accessible via the Find Connections page. In the right corner of the screen, you'll see a whistle icon and the words Coach Search (on smartphones you only see the icon). Give it a click, and you're there:

The coaches that are closest to you will appear first. As you go down the list, they get further and further away (coaches who haven't added their location are at the bottom). Below their name and location, you'll see the disciplines they specialize in. 

If no coaches are in your immediate area, it can still be extremely effective to hire an online coach. Sometimes this is necessary to find a coach who perfectly suits for you needs. Simply put, don't hastily eliminate someone if you can't meet face to face.

How do I contact a coach?

1) When you click on a coach in Coach Search, it opens a larger version of their profile card that includes a handy Message button:

By default, all SportTracks coaches have messaging turned on. As a user, you can turn on messaging so that any SportTracks user can contact you on your Privacy page. 

2) The Message button opens up this screen:

3) Write your inquiry (feel free to get specific about the training you're interested in) and hit Send:

Pretty painless, right?

If you already have a coach, they can train you through SportTracks for free by creating a SportTracks Coaching account. They'll be able to plan your training calendar, analyze and leave notes on your workouts, filter your Personal Records timelime and much more. Coaches can also provide SportTracks licenses to their clients.

We truly hope you enjoy using Coach Search. The overall purpose of tracking workouts and analyzing data is to improve. Hiring a qualified, experienced coach is an extremely effective way to achieve this, and doing it through SportTracks makes the whole process streamlined and even more impactful.

Cover photo of whistle by Kate Ter Haar

How To
http://cache.sporttracks.mobi/blog/images/2016/06/introducing-coach-cover-image-whistle.jpg

Heartrate Zone Goal Monitoring

$
0
0

HOT NEWS: The SportTracks analysis page just got another big update... You can now create charts showing cumulative weekly/monthly time in heart rate zones! This has been a popular entry on our feature request list for a long time (many people voted it up). We're thrilled to announce that it's available!

You can now create charts showing cumulative weekly/monthly time in heart rate zones!

In addition to that, we’ve also made some related enhancements that our "data nerd" customers are going to like, even if you don’t use an HRM. Read on for details...

Cumulative Heart Rate Zone Time

If you train with heart rate you likely have specific time goals to hit in each HR zone during a workout. Checking whether you hit your goals is easy. Just go to the Analysis tab on the workout detail page and look at the time in each zone:

On the other hand, if you have high-level HR zone time goals for an entire week or month, it’s a lot harder to see if you’re hitting them.  With our new cumulative HR zone charts, it’s easy.

This is definitely worth trying out. Go to your analysis page and pick a panel that you want to turn into a Cumulative HR Zone chart (wide panels work best). Click the customize button in the upper right corner of that specific panel and set the options to look like this:

Click close and you should see a chart that looks something like this:

Click the “Week” button below the chart to select a different period for time aggregation. You can choose day, week, month or yearly totals. You can also pick other groupings, such as showing cumulative heart rate time for a particular day of the week:

Or by sport, or workout time or distance:

Combining this chart with the date filter located at the top of the page could be useful for specific purposes, such as switching away from an LSD run approach to a training plan with more intense, longer runs. You should see that change right there in the data by comparing the distribution from this season to last season.

PRO TIP: Use browser tabs or windows to show data side-by-side for different time periods.

Multi-sport Volume Breakouts

If you don’t train with an HRM, the Cumulative Heart Rate Zone Time feature isn’t going to be useful. But keep reading…

As we hinted at earlier in this post, we've added another new feature related to chart stacking: The ability to stack by sport. This can be super helpful if you’re a triathlete looking to monitor training volume across sports. This is how you set it up:

  1. Click the panel customize button
  2. Set Type to Bar chart
  3. Set Value to Total time
  4. Set Group by to Start > Month
  5. Set Size to your preference
  6. Hit Close

You should see a chart that looks something like this:

With the stack by sport option, you can select any metric that aggregates as a sum, such as distance, calories, or elevation gain (woot!). For example, you may be interested to chart sport-specific effort, which feeds into your training load model for fatigue:

Compare the "Total effort" chart above with the one above it that shows "Total time". The fourth bar from the right illustrates how a relatively short bike ride can significantly influence effort level — and deeply impact Training Load.

And just like the heart-rate zone cumulative time charts you can group by more than just the start date. Take a look at the chart below which shows (no surprise) just how many calories I burn on my daily commute compared to my long weekend rides. Interesting stuff!

It works on line charts too...

The same stacking options in bar charts are also available in line charts. This can be easier to read for long time periods with a small aggregation period, such as week:

Saving your customized reports

Once you’ve got a chart or series of charts you like, don’t forget to use the “Save” command so you can come back to it quickly, or drop a bookmark to the report on your computer or mobile device's browser. You can read more about our amazing report customization features in this blog post.

We hope these new features are useful for your training. And as always, we have more new tools in the works! Let us know what you think of the new analysis features in the comments below.

~Enjoy

How To
http://cache.sporttracks.mobi/blog/images/2016/07/analysis-chart-stack-cover.png
Viewing all 221 articles
Browse latest View live